Premium Features
Premium Features
Money is a free download that allows users to try out the app without any commitment. The free version is limited to 100 transactions – reaching or exceeding this limit will no longer allow adding new transactions, and will require a Money Premium subscription, which includes Direct Downloads, to proceed. Premium features can be managed in Money Preferences > Premium.
Money Premium Subscription
Opting in for a Money Premium subscription unlocks the full unlimited functionality for the duration of the subscription and allows users to connect their accounts to over 32,000 financial institutions across 57 countries to have them synced automatically.
There are two subscription plans – Monthly and Annual. Both of these plans are renewed automatically unless canceled at least 24-hours before their scheduled renewal.
To manage your subscriptions, go to Preferences > Premium > Manage Subscriptions.
Users of Money Standard from Money 5 and 6
Money Standard users upgrading from Money 5 or Money 6 will be able to use the app without limits with the omission of connected accounts.
If you re-install Money or switch devices, you will need to activate Money Standard again in Preferences > Premium > Restore Purchases.
Preferences
The preferences in Money allow managing the following parameters:
- Currency
- Payees
- Categories
- Tags
- Rules
- Security
- iCloud
- Backup
- Premium features
Backup
By default, Money backs up your data regularly so it can be restored if necessary. It creates regular backups for up to 8 weeks in the past, so multiple copies of your data will always be available on hand.
You can also make backups manually in Preferences > Backup by clicking ‘Backup Now’. Money can store any number of manual backups as long as your device’s storage allows it. Manual backups will be stored indefinitely until deleted manually.
Restoring from backup
Restoring from backup is a last-resort feature, so we strongly recommend only using it in cases where circumstances absolutely require it.
When you select a backup in Preferences > Backup and click Restore, Money will automatically disconnect from iCloud, wipe all of its local data, and replace it with the data from the backup.
In order to resume syncing across multiple devices using the restored data, all Money data must be wiped from your iCloud storage, and all Money copies on other devices should be reset as well.
Wipe Money data from iCloud:
- Disable iCloud sync on all your devices that have Money installed. Do this in Money Preferences > iCloud;
- Wipe iCloud data:
on a Mac: in Preferences > iCloud, press the Option (alt) key – a ‘Wipe iCloud’ button will appear. Click it and confirm the action.
on an iOS device: in Preferences > iCloud, lightly shake your device to do this, a dialog will pop up asking if you want to wipe Money data from iCloud. Confirm it.
To completely delete any locally stored information in Money on iOS devices, simply delete and re-install Money.
To get instructions on how to completely delete any locally stored information from Money on Mac, contact support at support@jumsoft.com
Rules
Rules are used as sets of actions to automatically perform when importing data from supported data files. To access a list of import rules and manage them, go to Preferences > Rules.
Manage import rules
- Go to Preferences > Rules, click the Add button on the bottom of the list;
- Name the rule;
- Choose the main criterion, which will be used as a condition for applying the rule (date, account, payee, stock, etc.). Click the “+” button to select more criteria for your import rule. The selection of criteria is presented in the following way:
“All/Any” of the following are true:
“Variable 1” “Variable 2” “Variable 3 (if required)” [keyword entry field]
Every time you import a data file, Money will apply the rules to the items that match their criteria.
To change the criteria of an import rule, go to Preferences > Rules, select the rule you wish to change and click the ‘i” icon on the right of the list.
To delete import rule, select the rule(s) you want to delete (hold Cmd while clicking to select multiple items).
Click the “-“ button on the bottom of the payee list.
or
Ctrl + click on the selected item(s) and select Delete.
or
Press Backspace.
Tags
Tags are keywords used to give more differentiating parameters to your transactions. Use tags to add specific details to your transactions, which will allow viewing even more detailed reports based on tags. The tags list in Preferences > Tags allows you to add, edit, or remove tags. You can use preset tags in Money, as well as create your own. Tags can also be added on the go, when adding transactions.
To use a word as tag, put # before it in notes. Using this method, you can write complete sentences in notes and use words in the sentence as tags.
For complete management of tags, go to Preferences > Tags.
Manage tags
Tags can be entered when creating or editing transactions on the go. If the tag you type in the note field does not exist, you can create a new tag from the entry you typed.
For complete management of tags, go to Preferences > Tags.
Add a new tag
To add a new tag in preferences, click the Add button, a new tag entry will appear in the list. Enter a desired keyword and press Enter.
Edit tags
You can edit tags in preferences by double clicking a tag in the list or ctrl + clicking a tag and selecting Edit.
This will allow editing the keyword.
Merge tags
If you would like to merge multiple tags to be reflected as one in the reports, you can use the merge feature.
Select multiple tags by holding Cmd and clicking in the list in Preferences > Tags and ctrl + click on them. Select Merge Selected.
This will merge selected tags into one and make appropriate changes in existing transactions.
Delete tags
Select a payee you wish to delete (hold Cmd while clicking to select multiple items).
Click the “-“ button on the bottom of the payee list.
or
Ctrl + click on the selected item(s) and select Delete.
or
Press Backspace.
Payees
A payee is a company or a person with whom a transaction is conducted. The payees list in Preferences > Payees allows you to add, edit, or remove payees. Money offers payee discovery using an Apple Maps API. You can also add your own payees when adding transactions on the go. Later you can customize them with personalized pictures, icons.
Manage payees
Payees can be entered when creating or editing transactions on the go. If the item you type in the payee field does not exist, you can create a new payee from the entry you typed.
For complete management of payees, go to Preferences > Payees.
Add a new payee
To add a new payee in preferences, click the Add button, a new payee entry will appear in the list. Enter a name for your payee – Money will use an Apple Maps API to discover matching payees, or you can create your own.
Edit payees
You can edit payees in preferences by clicking the Details button on the right of the list by each payee and clicking the Edit button in the popover.
This will allow editing the payee’s name, address, location, add notes and tags.
Merge payees
If you would like to merge multiple payees to be reflected as one, you can use the merge feature.
Select multiple payees by holding Cmd and clicking in the list in Preferences > Payees and ctrl + click on them. Select Merge Selected.
This will merge selected payees into one and make appropriate changes in existing transactions.
Delete payees
Select a payee you wish to delete (hold Cmd while clicking to select multiple items).
Click the “-“ button on the bottom of the payee list.
or
Ctrl + click on the selected item(s) and select Delete.
or
Press Backspace.
Categories
The transaction category defines a class of spending or income. Money has many built-in categories, and for accurate finance tracking, it is important to assign proper categories for all transactions, as the accuracy and level-of-detail for reports and budget rely heavily on transaction categories.
Three types of categories in Money:
- Income – salary, bonuses, dividends, allowances, interest income, etc.
- Expenses – food, rental, entertainment, clothing, travel, etc.
- Transfer – transfer of funds from one account to another.
Many categories contain subcategories. A subcategory is used to provide further details to a transaction for accuracy. For example, an expense categorized as “Automobile” may have subcategories like oil, gas, service, repair, parts, etc. New categories can be created when adding a transaction.
Manage categories and subcategories
Categories can be entered when creating or editing transactions on the go. If the item you type in the category field does not exist, you can create a new category.
For complete management of categories and subcategories, go to Preferences > Categories.
Add a new category or subcategory
To add a new category in preferences, click the Add button, a new category will appear in the list. Enter a name for your category.
To add a new subcategory, find the option “+ Subcategory” under each category in the category list.
Edit categories or subcategories
You can edit categories and subcategories in preferences by clicking the Details button on the right of the list by each category and subcategory.
A category/subcategory edit popover will appear. Click on the icon to change the icon. Click on the name to edit the name. Below the name there is dropdown list of categories in case you want to change the item’s parent category.
Merge categories
If you would like to merge multiple categories or subcategories to be reflected as one, you can use the merge feature.
Select multiple categories or subcategories by holding Cmd and clicking in the list in Preferences > Categories and ctrl + click on them. Select Merge Selected.
This will merge selected categories into one and make appropriate changes in existing transactions.
Delete categories or subcategories
Select a category or subcategory you wish to delete (hold Cmd while clicking to select multiple items).
Click the “-“ button on the bottom of the category list.
or
Ctrl + click on the selected item(s) and select Delete.
or
Press Backspace.
Currency
Money supports virtually all internationally available currencies and a variety of cryptocurrencies and offers constantly updated exchange rates. You can keep all currencies updated automatically or indicate your own exchange rates.
Manage currencies
Currencies can be added when creating or editing transactions on the go. Edit a transaction to change/add currencies associated with it.
For complete management of currencies, go to Preferences > Currency.
Add a new currency
To add a new currency in preferences, click the Add button and select the currency from the list.
Edit currencies
You can edit currencies in preferences by clicking the Details button on the right of the list by each currency.
A currency edit popover will appear. If you uncheck the checkbox to “Update Rate Automatically”, you will be able to enter an exchange rate manually and this currency’s rate will no longer be updated until you change this setting.
Delete currencies
Select a currency you wish to delete (hold Cmd while clicking to select multiple items).
Click the “-“ button on the bottom of the category list.
or
Ctrl + click on the selected item(s) and select Delete.
or
Press Cmd + Backspace.
Note: you will not be able to delete a currency as long as it has transactions associated with it.
Investments
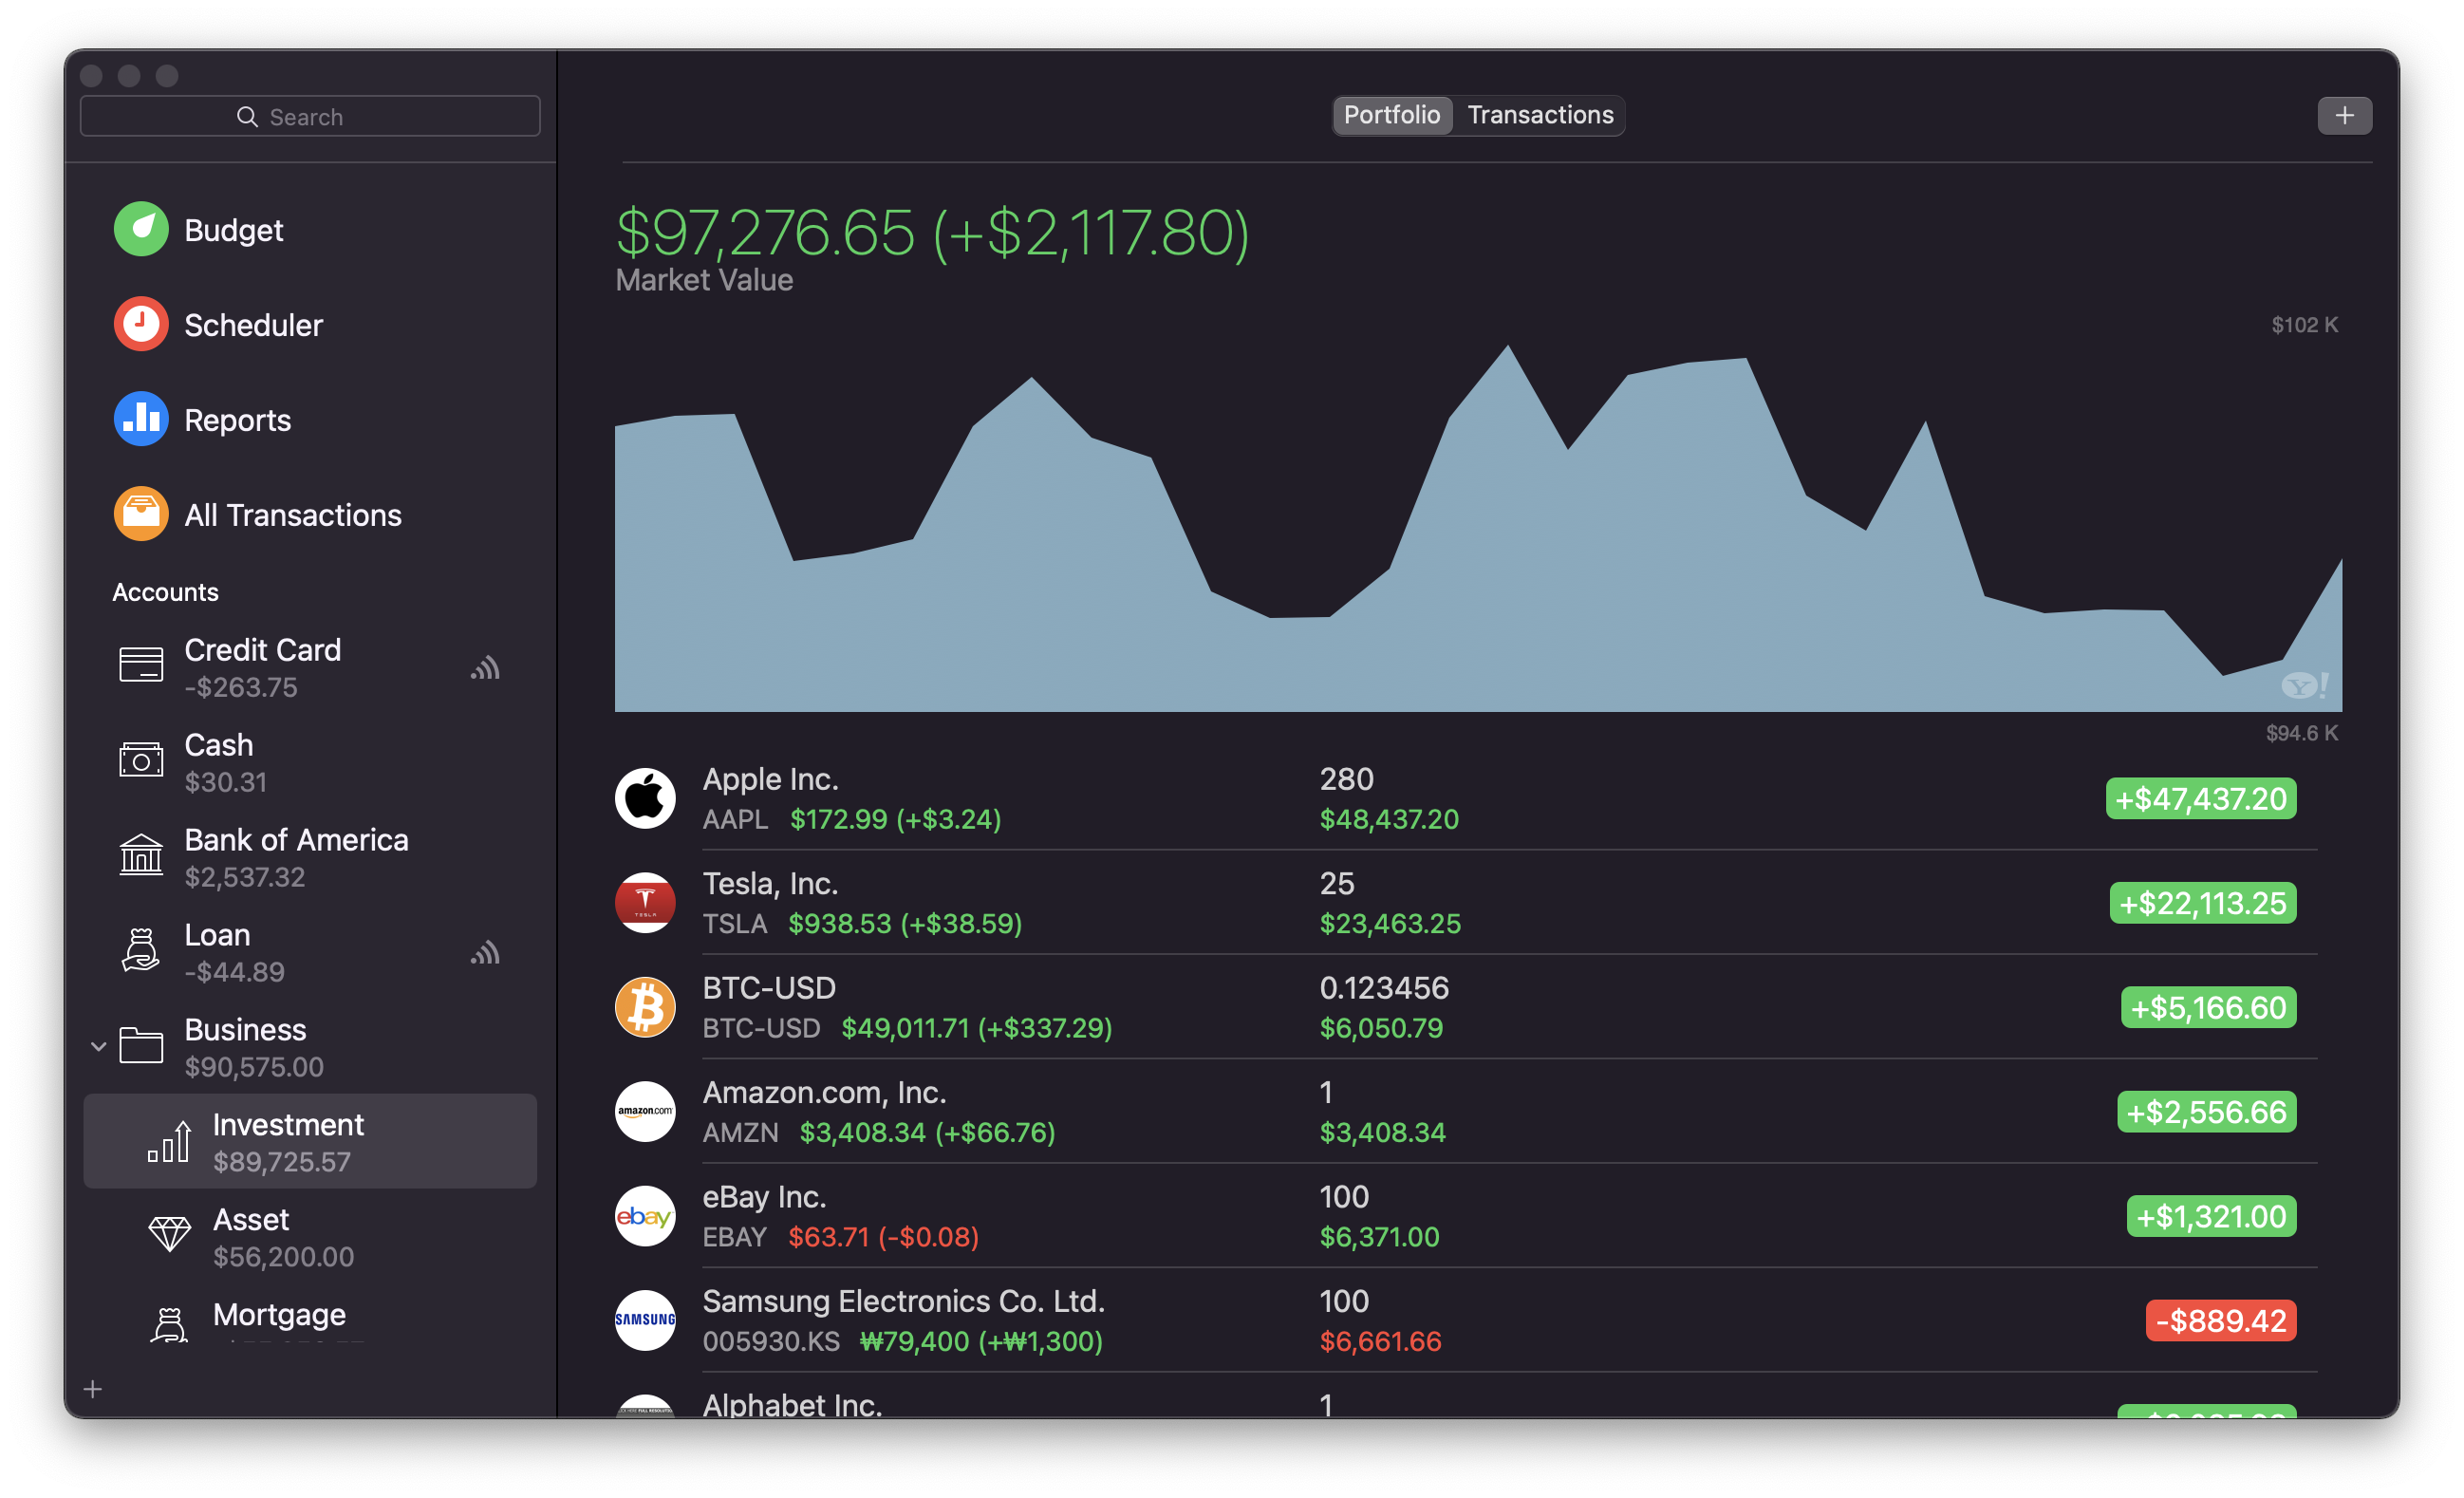
Money can be used to track activity in your investment accounts (like individual retirement accounts, simplified employee pension plans, etc.). You will notice that the investment account is divided into two main components that work together to help you track investments in Money:
Transactions – Used to record all transactions related to the securities you own.
Portfolio – Provides a list of all securities you own or are interested in, a quick summary of your gains and losses, the present and historical value of your holdings, as well as a place to track stock and currency quotes.
Note – you can add new securities and transactions in both sections. However, the full list of securities and their values is only displayed in Portfolio, and the full list of transactions is only available in the transactions view.
To create a new investment account, proceed with the usual steps of creating a new account, only select “Investment” as an account type. You will also need to indicate the account from which the payments will be made.
Adding investment transactions
To add a new investment transaction, select your investment account in the sidebar and go to transactions tab.
- Click the Add button on the top right corner of the investment transaction workspace or ctrl + click anywhere in the investment transaction workspace;
- Enter the details to match the data from your investment transaction:
- Name or code of security – enter the name or code of a security you wish to add, and Money will display what it finds;
- Type – select one of 4 transaction types (buy, sell, dividend, split);
- Number of shares or split ratio – enter the number of shares to purchase or sell or the share split ratio;
- Amount – indicate the value of the transaction;
- Date – enter the date of the transaction;
- Notes & #Tags – add notes and tags or attachments to the transaction;
- Click the Details button on the right of the transaction to edit it, and add additional information, such as commission paid or earned.
Alternatively, you can add a security in the Portfolio workspace by clicking the Add button in the top right corner, then ctrl + click on the security in the portfolio and select the necessary option – Buy or Sell.
Tracking securities
To track securities that you own, you must first create an investment account and then add several investment transactions to record the purchase of these securities. You can then monitor the performance of your holdings using the portfolio. You can also add securities you do not own but want to keep an eye on to follow their quotes. All your tracked securities are displayed in the portfolio tab.
Add a security you own
- Go to the portfolio section of your investment account, click the Add button to add a security;
- Enter the security’s name or code – Money will use data from Yahoo! Finance to update quotes;
- Ctrl + click on the added security and use the Buy option, to enter the amounts of your investment into the security and track your progress over time.
Alternatively
- Go to the transaction section of your investment account, click and add a new transaction;
- Configure the transaction to reflect the data of and your investment in the security. This will add the security for tracking its progress in the portfolio section.
Adding a security for following
- Go to the portfolio section of your investment account, click the Add button to add a security;
- Enter the security’s name or code – Money will use data from Yahoo! Finance to update quotes.
Edit investments
You can edit the securities or investment transactions like you would edit regular transactions. Find the item you want to edit and click the Details button on the right of the item’s list entry and edit the information you need or ctrl + click on the item in the list and select Edit.
Delete investments
You can delete securities or investment transactions like you would delete regular transactions. Find the item you want to delete in the list, ctrl + click on it and select Delete. Alternatively, press Cmd + Backspace to delete a selected item.
Portfolio
Portfolio works with your investment account to provide summary information about the securities you own or follow. Every investment account has a portfolio view to track securities associated with it. Any securities that are added via investment transactions are automatically added to the portfolio chart.
Portfolio also automatically includes data from your investment transactions. For example, if you add transactions buying 9 shares and selling 4 of the same shares, portfolio will automatically indicate that you own 5 shares and display their cost value, market value, and gain or loss.
Portfolio entries that have transactions associated with them feature the following data:
- Name;
- Symbol;
- Quote;
- Shares – the number of shares you own based on transactions entered with this security;
- Cost – the cost basis of the security, calculated from the price and commission entered for all relevant transactions associated with this security;
- Market value – the current estimated value of your shares, equal to the quote multiplied by the number of shares;
- Day gain – the difference between the current quote and the security’s opening price on the current date;
- Gain – the difference between the current value of the shares and their purchase value;
- Overall return – your final result with the security. It includes all capital gains and any dividends or interest paid. Overall return differs from stock price growth because of dividends.
Reports
Using reports, you will see Money demonstrate its true value. After putting in the time and effort to set up your accounts, enter transactions, and categorize your income and expenses, you can use reports to make sense of all that information quickly and easily. Reports rely heavily on transaction categories and payees, so the key to generating effective and deeply informative reports is to assign appropriate categories and/or payees to each of your transactions.
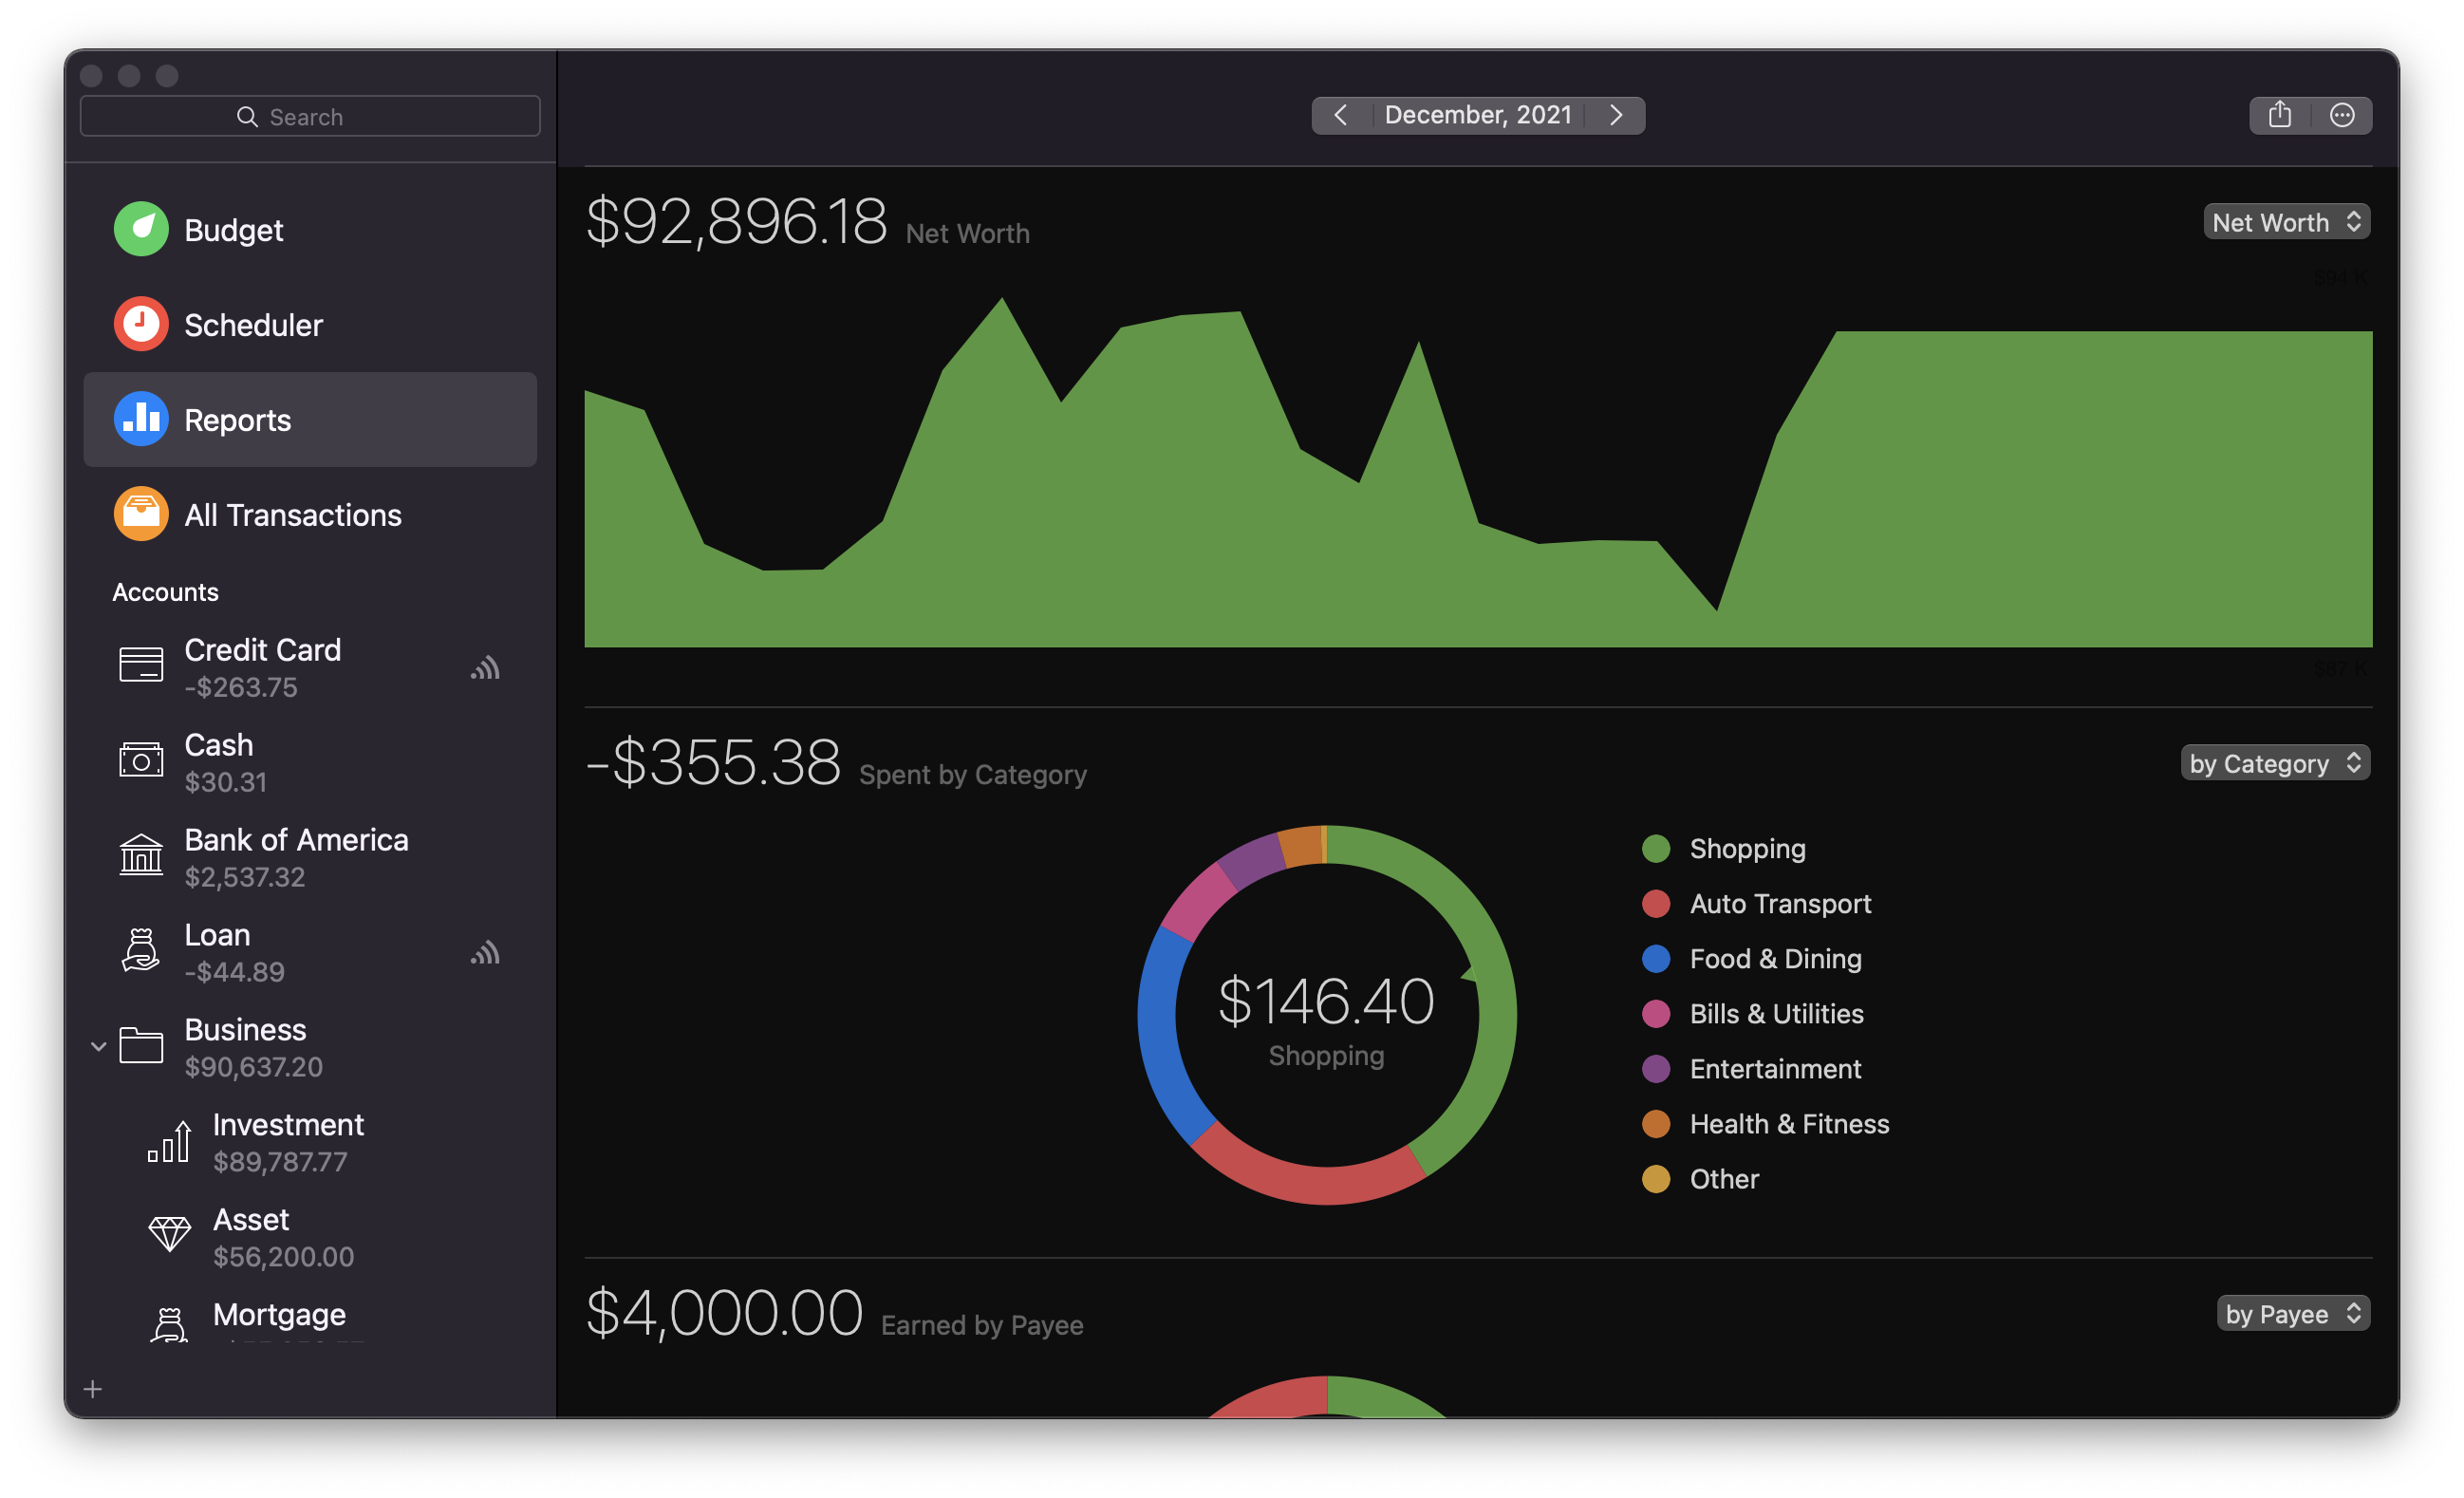
With virtually no additional setup, Money can generate informative and visually rich breakdowns of your spending habits, track changes in a particular expense from month to month, list all the transactions assigned to a particular category, and much more. With each entry of data into Money, reports are automatically updated and can be printed, saved, or shared.
Customizing reports
Reports can be customized to reflect a certain period. Money supports the following default periods for reports:
- Week;
- 2 Weeks;
- Month;
- Year;
- Custom.
Note: default periods can have a custom start date.
By default, Money reflects all transactions in reports. To select what data is included in the reports, click the gear icon in the top right corner of the report workspace. This will allow selecting what accounts, payees, categories, and tags to include in or skip from the report. Remove checkmarks adjacent to the items that you want to be excluded from the report. To include an item in the report, put a checkmark adjacent to it.
You can further customize the report sections by selecting what to display. You can see the Net Worth, Net Income and Future Forecast graphs and charts based on your selected period.
The second section tracks your expenses. You can see the graphs and charts based on your expenses during your selected period by category, payee, tag, or date.
The third section tracks your income. You can see the graphs and charts based on your income during your selected period by category, payee, tag, or date.
The fourth section lists your transactions for your selected period by category, payee, tag, also any recurring transactions.
Note: you can enter a more detailed view for each section by clicking on it in the Reports workspace.
Scheduler
Some transactions occur on a regular basis. The Scheduler in Money is designed to conveniently display your upcoming transactions in a weekly or monthly calendar view, with effortless confirmation.
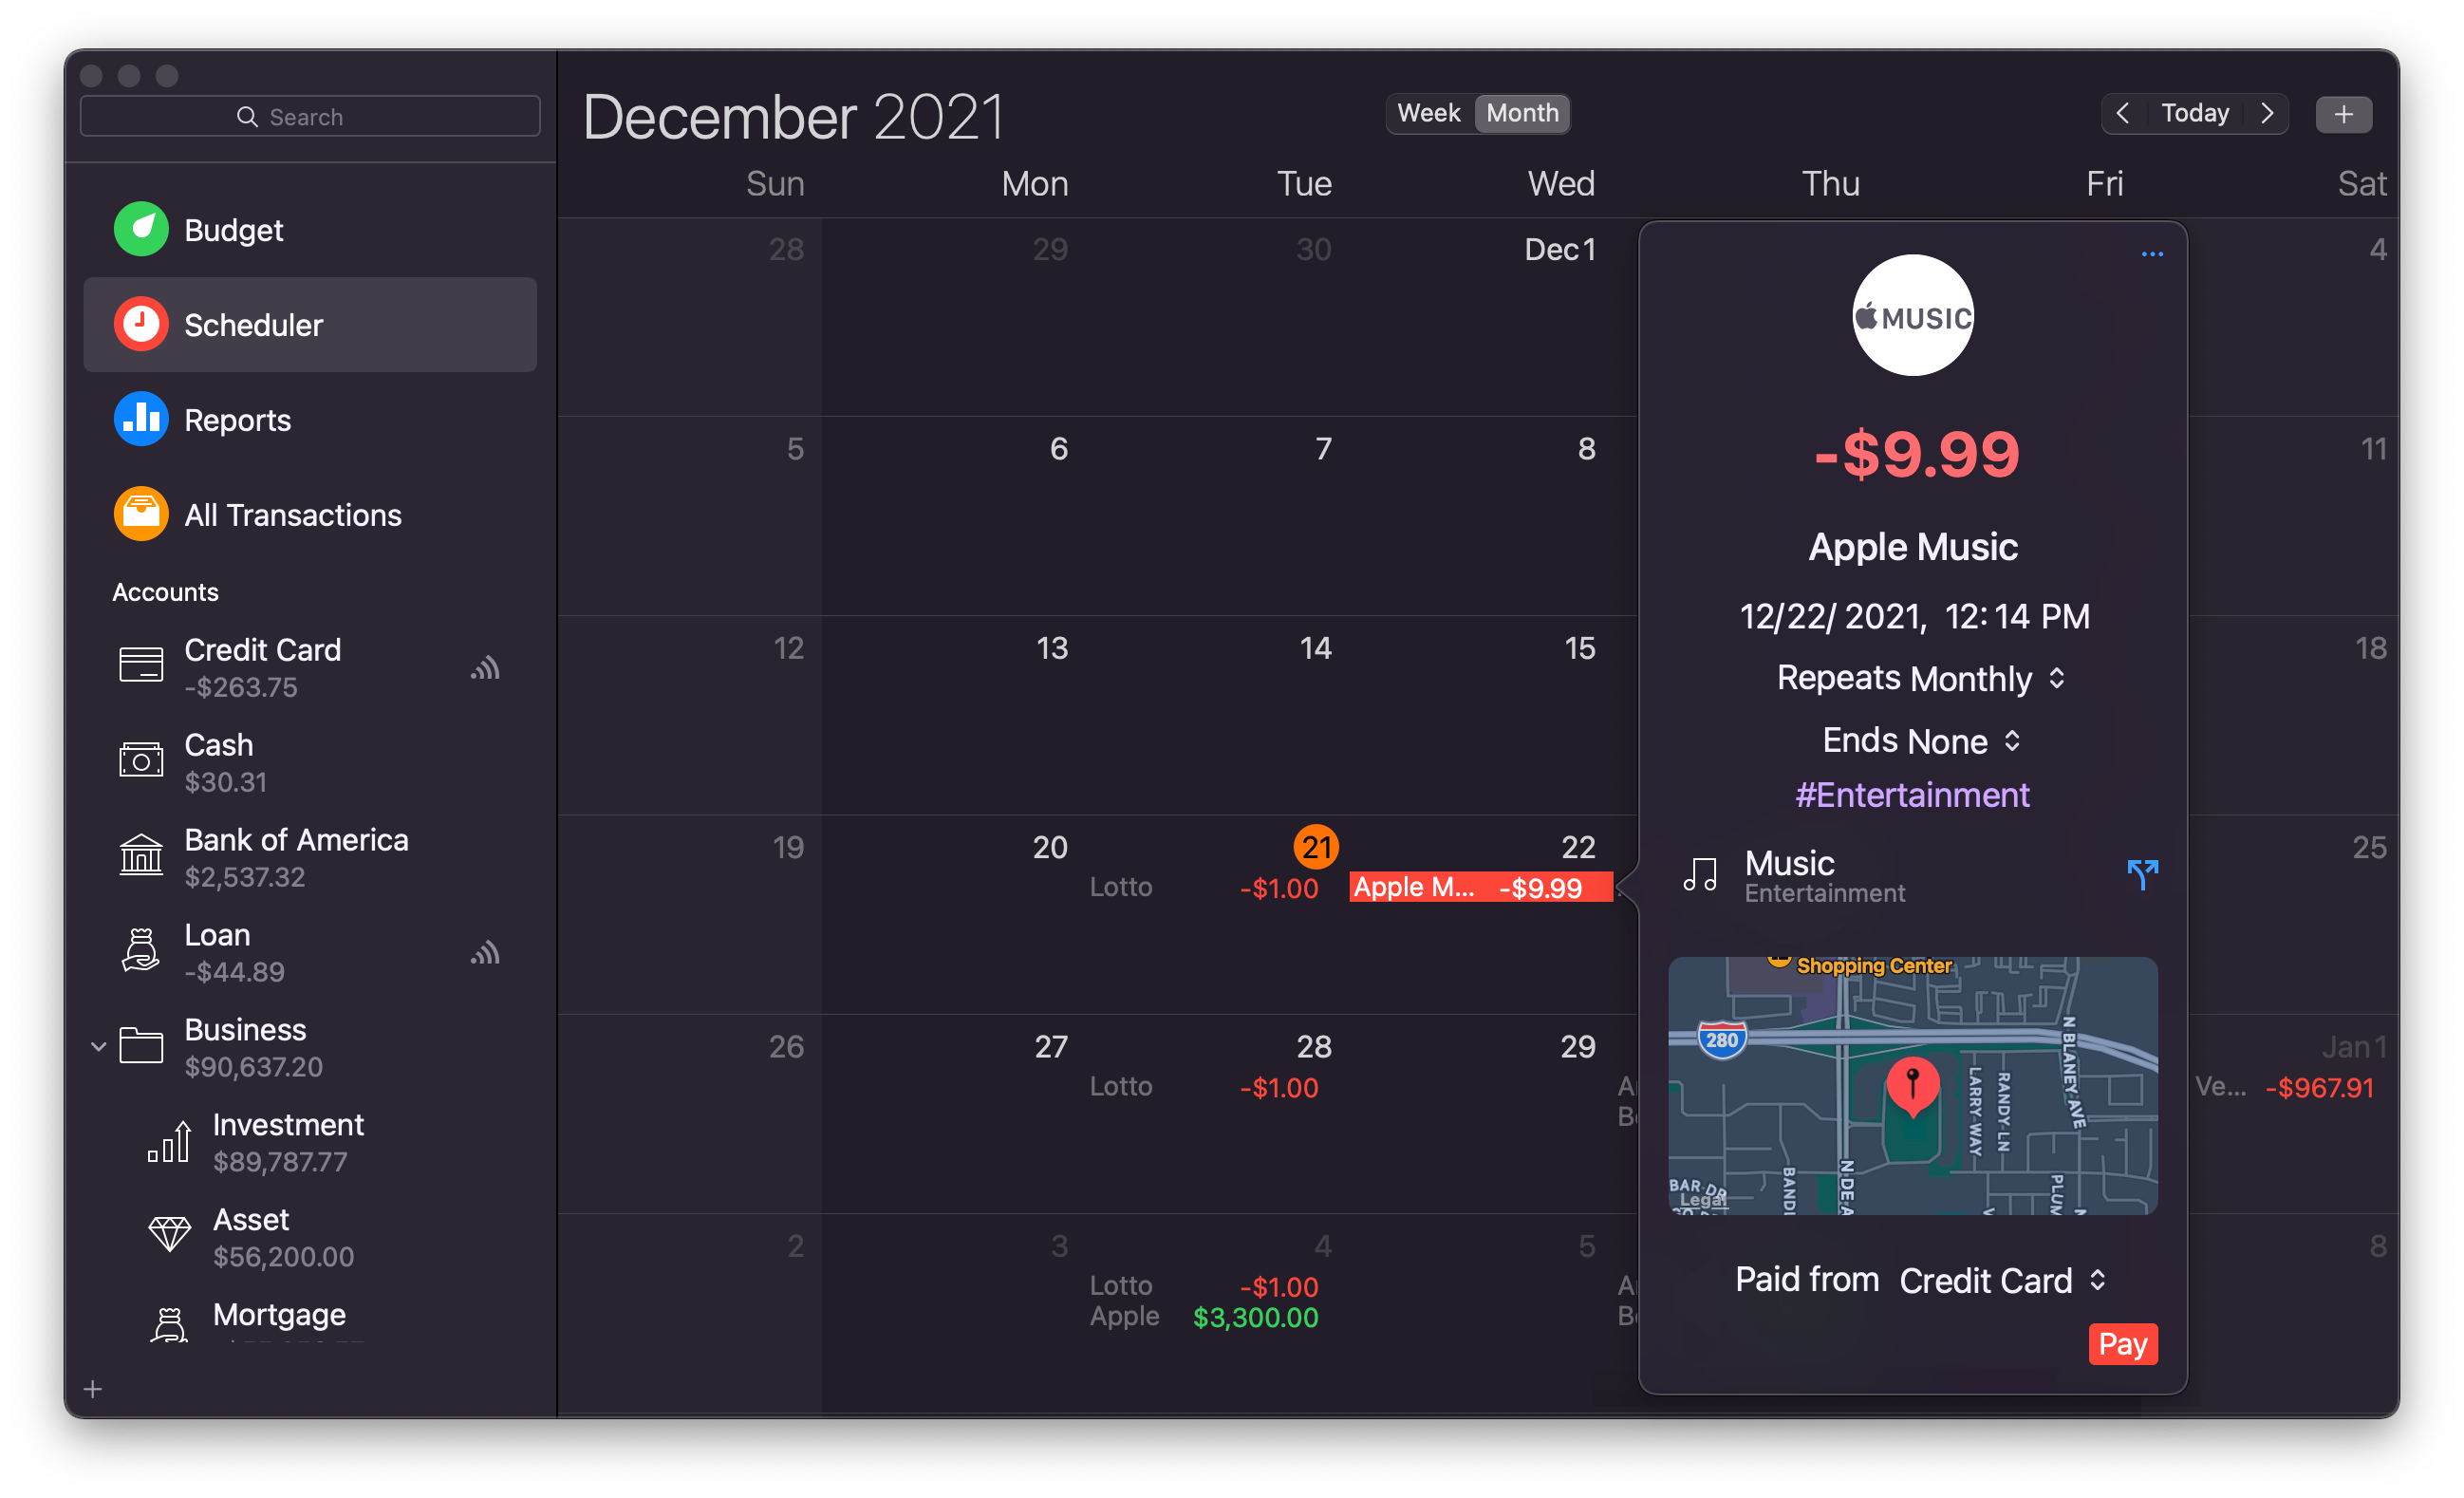
You can see and manage a list of existing transactions, as well as schedule new transactions in the Scheduler. Access it from the sidebar.
A scheduled transaction contains information to tell Money when and how often to generate the recurring transaction. When it is due, it will appear in the workspace of the scheduler and the transaction’s account. To confirm the transaction, click the Pay button in the workspace.
Money supports the following frequencies for recurring transactions:
- One time
- Daily
- Weekly
- Monthly
- Yearly
- Every 2 weeks
- Every 4 weeks
- Every 2 months
- Every quarter
- Every 6 months
Create new scheduled transaction
- Select Scheduler in the sidebar;
- Click the Add button in the top right corner of the scheduler workspace;
- Enter the usual transaction-related information (payee, amount, category, notes, tags, etc.);
- Select transaction’s date and its frequency;
- Click the Details button on the right of the transaction to get to transaction popover and select an account or edit the transaction details.
Note: a scheduler can also work with recurring transfers from one account to another. To schedule a transfer, create a scheduled transaction regularly but select account to “Transfer To” or “Transfer From” in the category selection field.
Schedule an existing transaction
- Find the transaction you would like to schedule;
- Ctrl + click on this transaction and select “Schedule…”, a transaction popover will appear;
- Edit the transaction data if needed, select the transaction date and recurrence frequency.
Delete scheduled transaction
- Find the scheduled transaction you intend to delete in an account or in the scheduler;
- Select the transaction, ctrl + click on it and select Delete, or select and press Cmd + Backspace;
- Money will ask if you want to delete a single payment or the current and all future payments. Select the intended option.
Budget
A user-friendly budget allows you to keep track of your spending habits and keeps you on track of your financial goals.
The budget in Money is based on budget categories, which offers a clear overview of income and expenses, to see where you are in terms of your financial goals and plan upcoming income and expenses effortlessly.
Money allows four budget views: one week, two weeks, one month, one year. All these periods can have custom start- and end-dates.
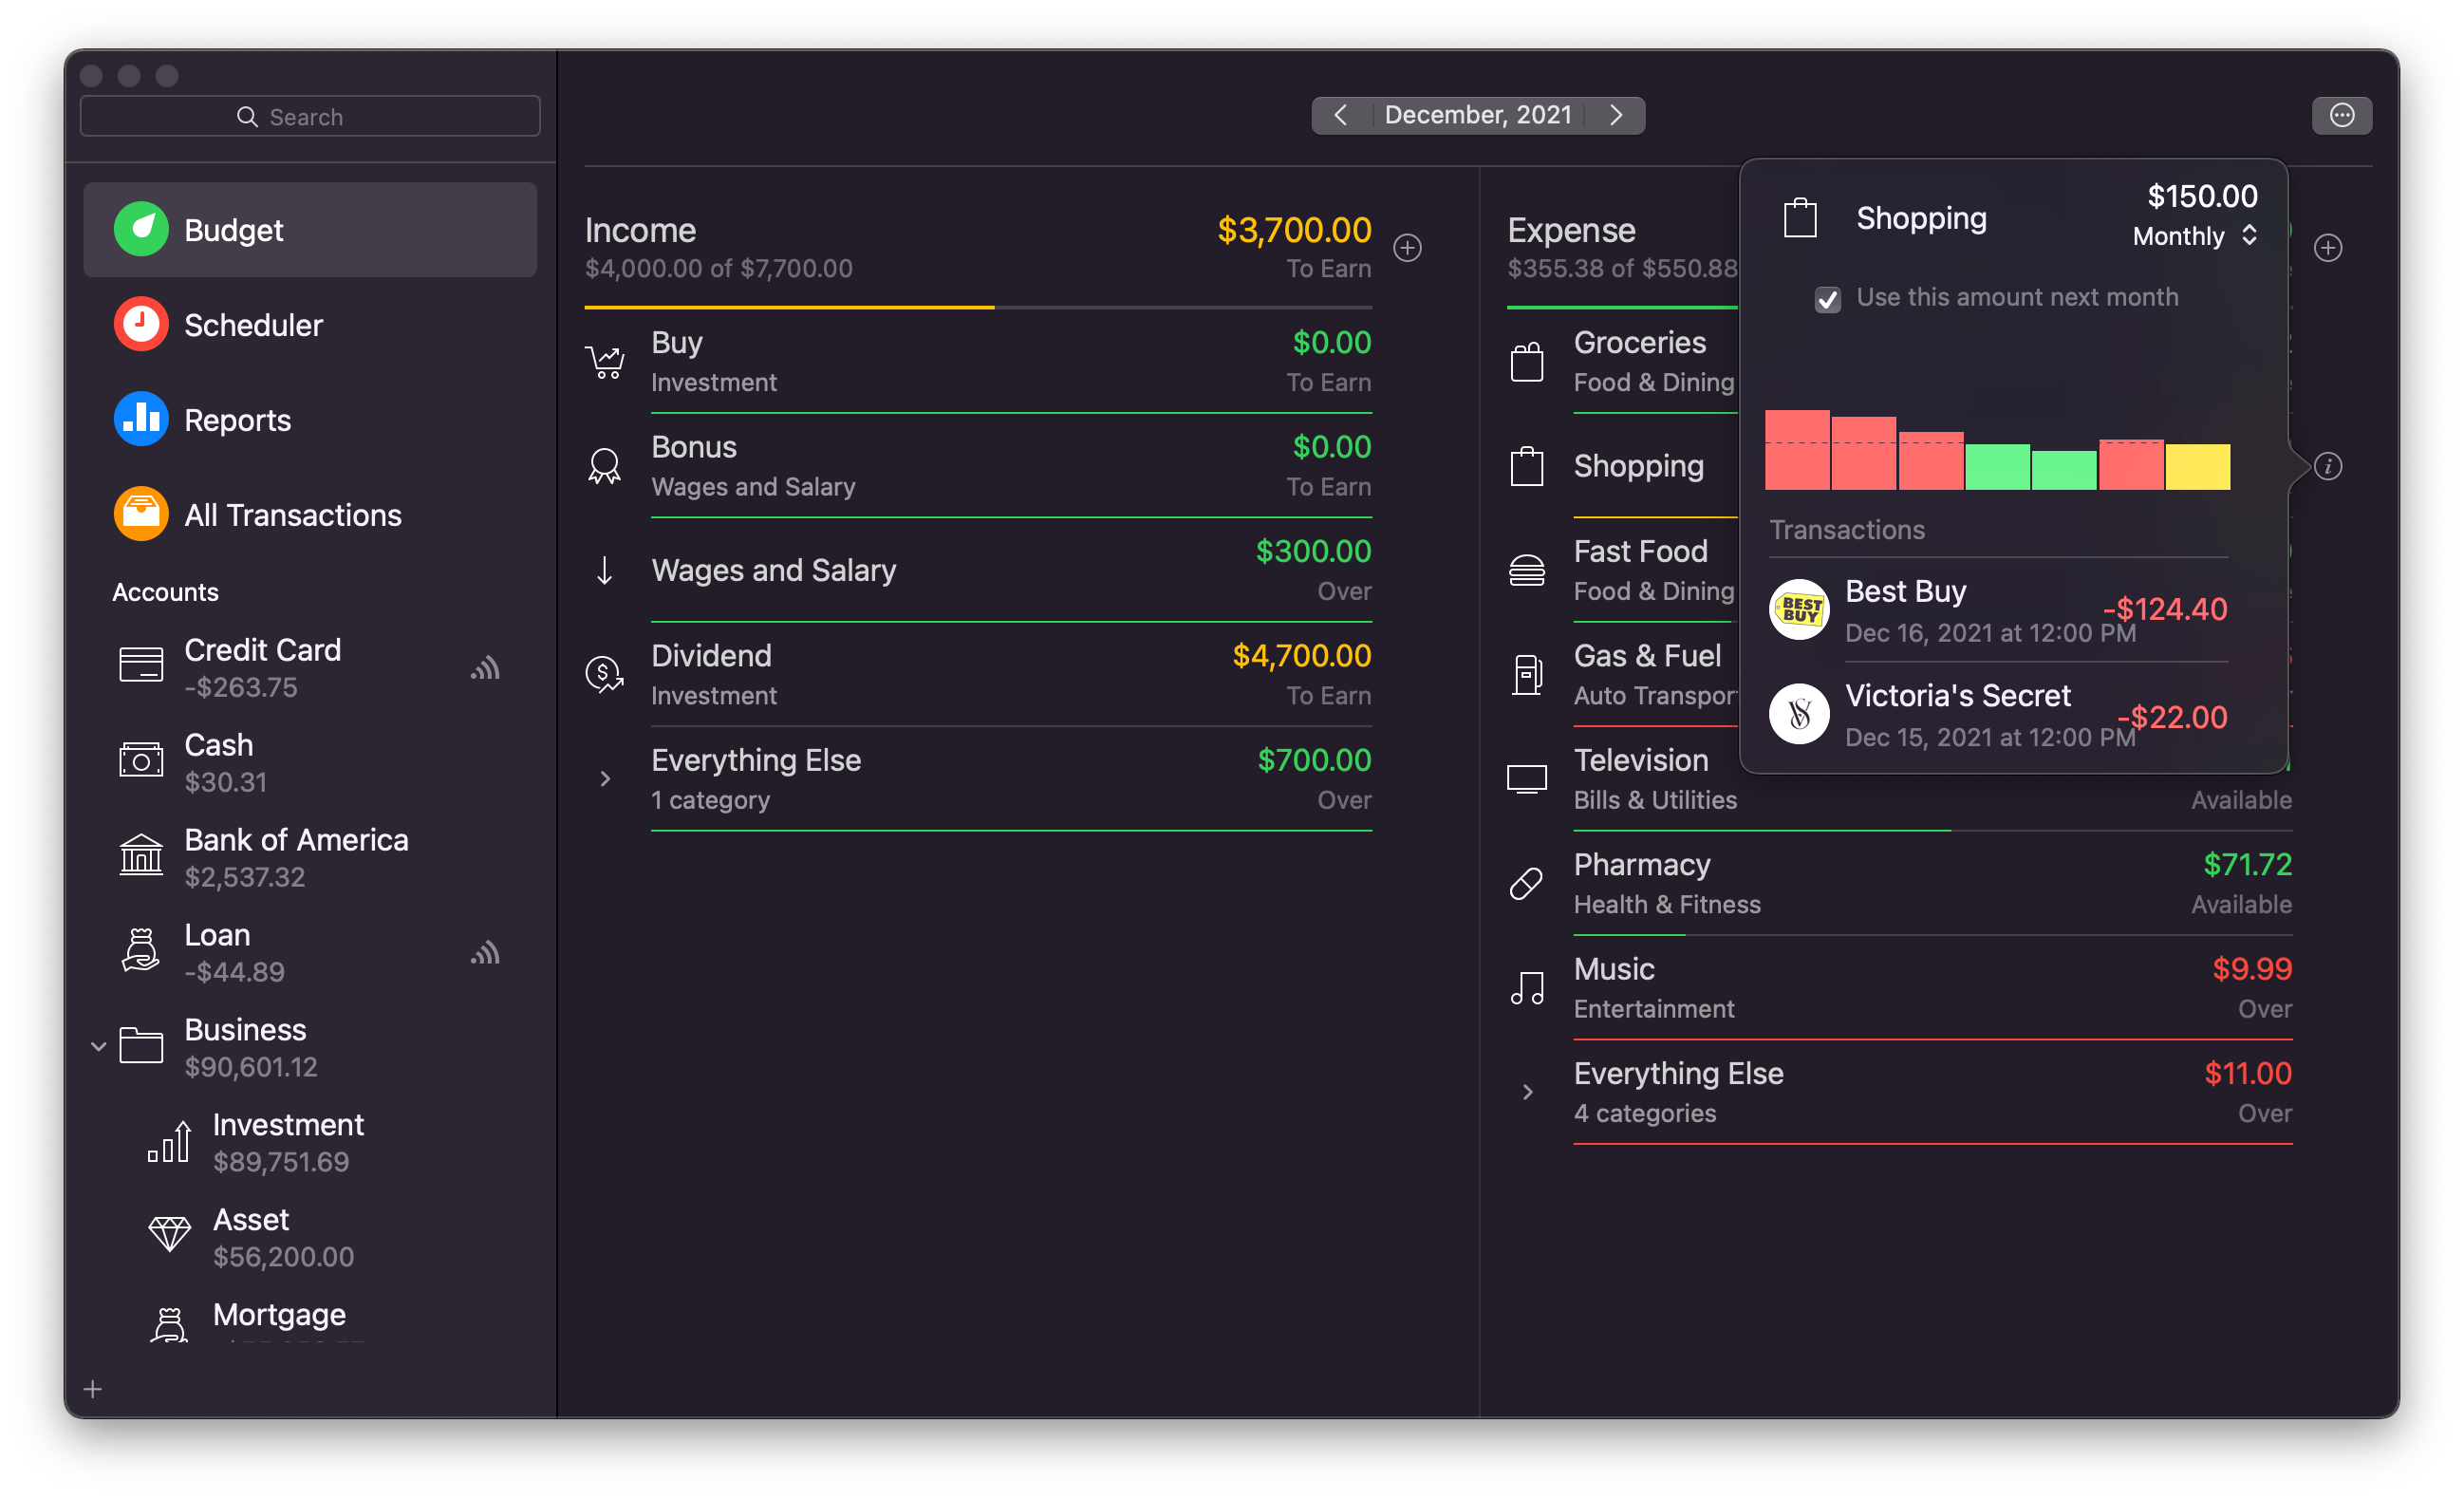
Start using budget
Budget is accessible from the sidebar. The budget workspace is divided into two columns: Income and Expense. The left column will contain all your income transactions, while expenses will be reflected on the right column.
To start using budget, click the Add button in the income or expense column. This will open a category selection popover, where you can select the category and set a desired budget for the period indicated at the top of your workspace. After adding a category and setting a budget, transactions entered in that category will be reflected in your budget, and you will be able to clearly see if you are below or over your planned budget for the particular category or overall this period.
When you add transactions with new categories into accounts reflected in budget, these transactions will be displayed under Everything Else in the budget. You can quickly add these categories to your budget by clicking the Add button adjacent to the unbudgeted category.
Change what you see in budget
Money allows easy selection of data that is shown in budget and adjusting how it is shown.
Change budget period
You will see the budget period start and end dates on top of the workspace. A click on the dates will invoke a period selection and an ability to select a period’s start date. After selecting this, you can easily move around to compare similar periods by clicking the arrows adjacent to the date.
Select what data is shown
By default, Money reflects all transactions in budget. If you want to change this, you can click the gear icon on the top right corner of the budget workspace. This will allow selecting what accounts, tags, or transfers to include in or skip from the budget. Remove checkmarks adjacent to the items that you want to be excluded from the budget. To include an item in the budget, put a checkmark adjacent to it.
Note: Money employs visual cues to quickly inform you about the status of your budget. The budget amounts in the Income column are yellow if your income is below your plans and turns green as soon as you meet or exceed your plan. The amounts in the Expense column are green if they are below your set budget, turn yellow when you approach the planned amount, and turn red if you spend more than you planned.
Transactions
Transactions are the key element of Money. They reflect your real-life income and expenses and change the balances of your accounts.
Money has three types of transactions::
Expense – money leaves the account;
Income – money is added to the account;
Transfer – money is transferred from one account to the other.
Note: to get more information about or edit a transaction, click the Details button on the right side of the transaction in the list, it will open the transaction information popover.
To see more transactions with the same payee or category, click the Details button beside the payee or category right in the workspace or within the transaction popover.
Adding transaction
If you have a bank connection set up, Money will download your transactions automatically, simply go to the account you wish to update, and click the Download Transactions button to get the latest available transactions.
To add transactions by hand:
- Select an account in the sidebar;
- Click the Add button on the top right corner of the workspace or ctrl + click any transaction in the list and select New Transaction;
- Enter the transaction information:
- Payee – select from the list of nearby payees based on your location or start typing a name and see if it appears on the list. If the payee is not on the list, click the Add button in the list to add a new payee. You can later edit this in Preferences > Payees;
- Amount – type in the necessary amount;
- Date – indicate the date of the transaction;
- Category – Money will suggest a category for known payees automatically. To change it, click the category field right on the transaction or in the transaction popover;
- Notes and Tags – Enter relevant notes and assign tags to the transaction, so you can find it easily later, or generate reports based on tags. To indicate a word as a tag, type # before it;
- Transaction type or currency – if you want to change a transaction type (income/expense), click the Details button on the right side of the transaction in the list to open the transaction popover, then click the arrow near the amount – you will be able select the type of the transaction (income/expense) and change its currency;
- Attachment – you can link any file on your hard drive with the transaction. To do this, click the Details button to open the transaction popover, click the Notes & #Tags section and select the attachment icon – it will open a file browser. Alternatively, you can open the transaction popover, and simply drag and drop a file onto the transaction popover.
Refunds: if you are recording a refund transaction, you can mark it as a ‘refund’ in the Category section – the refund toggle is available as the topmost entry in the list. Once you mark a transaction as a refund, its amount will not add to your income or expenses but will be taken from them
Deleting transactions
- Ctrl + click a transaction in the workspace
- Select Delete
Alternatively press Backspace to delete a transaction.
Note: if you have deleted a transaction by accident, select Edit > Undo or press Cmd + Z to undo this action.
Moving transactions to other accounts
- Select a transaction in the workspace (press and hold Cmd to select multiple transactions);
- Drag the selected transactions to the appropriate account on the sidebar.
Transferring funds from one account to another
Money allows easily transferring funds to and from existing accounts. A transfer creates two transaction entries in the related accounts indicating an expense in the source account and an income in the destination account. Changes made to one of the transfer’s entries are immediately reflected on another corresponding entry.
To add a transfer:
- Select the appropriate account in the sidebar;
- Add a new transaction to the account by clicking the Add button in the workspace or ctrl + clicking and selecting New Transaction in the workspace;
- Scroll down in the list of categories to reach “Transfer to” or “Transfer from”;
- Select the appropriate account into or from which you will be transferring funds;
- Enter the rest of the transaction’s information.
Note: if the source and destination accounts have different currencies, Money will calculate the rate automatically, using the latest or preset rate. To see and edit rates, go to Preferences > Currency.
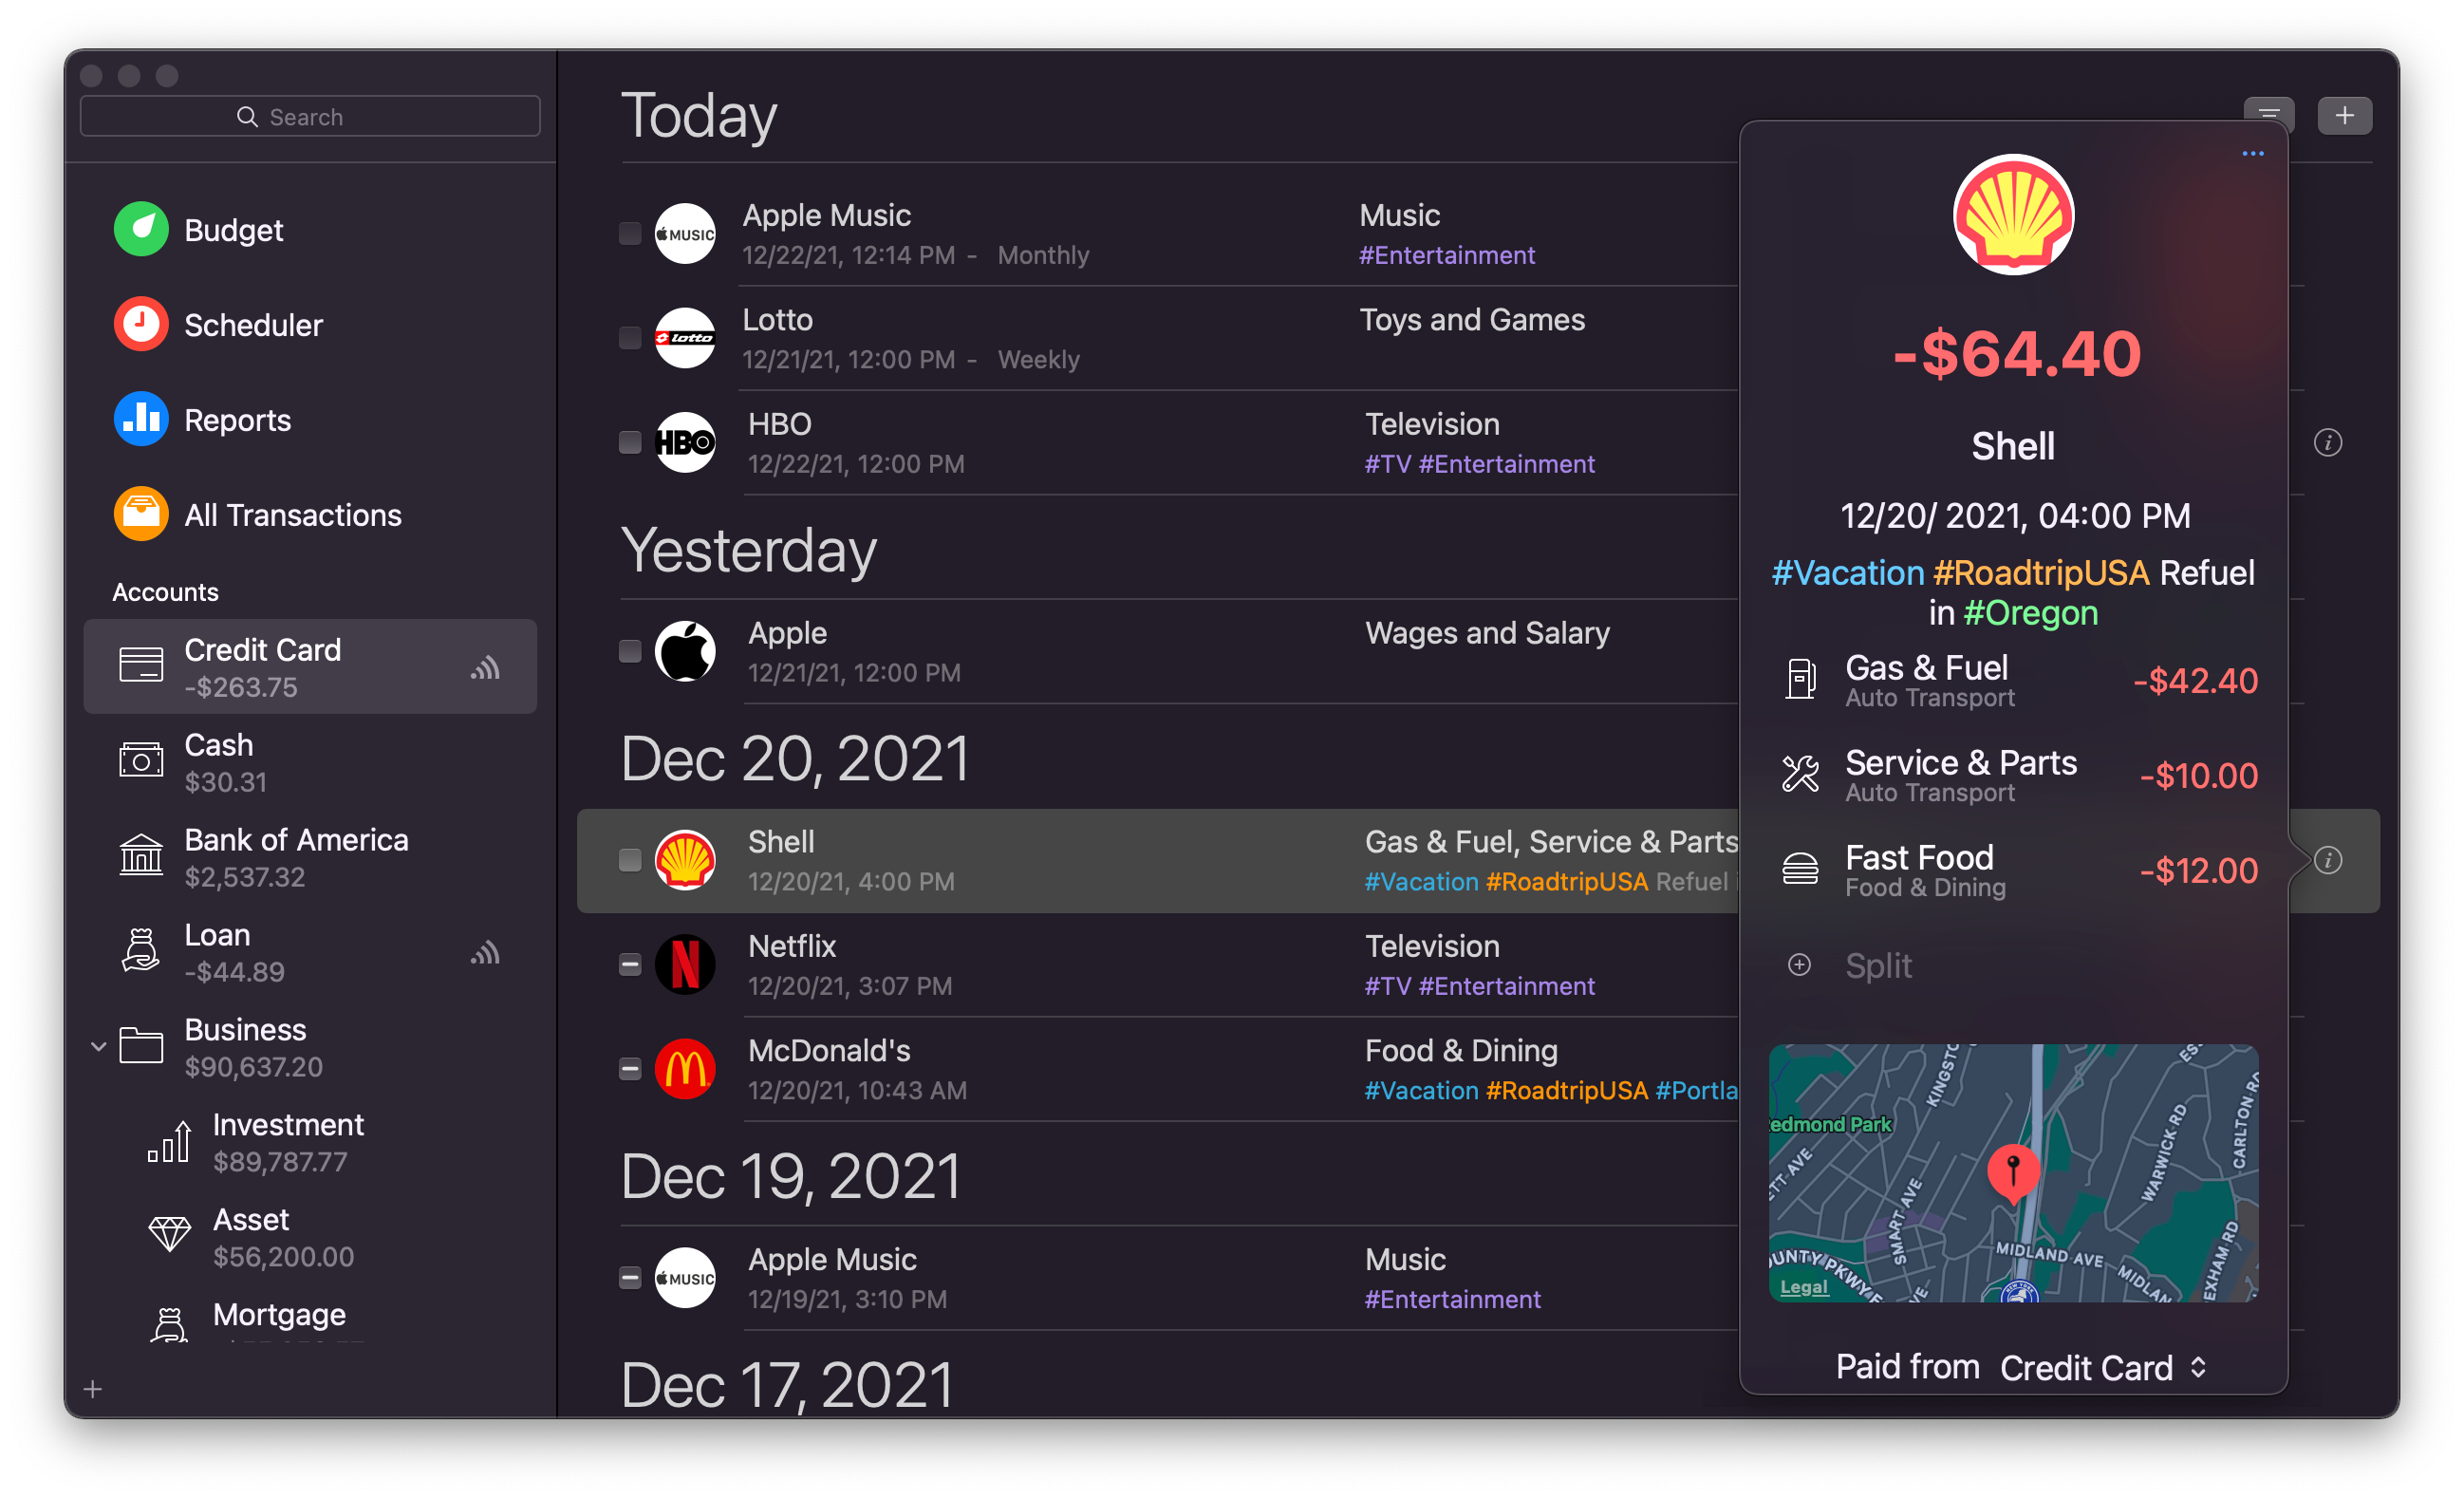
Splitting transactions
In certain situations, you may wish to account for multiple cash flow categories in a single transaction. Money refers to this function as a split. You can split a transaction’s total amount into different categories.
To add a split:
- Add a new transaction or select and existing transaction and click the Details button on the right of the workspace to invoke the transaction popover;
- Click the Split button to the right of the category, start editing the amount of the first category;
- Splits will appear as you edit each category amount until their sum is equal to the total transaction amount.
Note: a single currency must be used when splitting a transaction.
Reconciling a transaction
Although you are likely to perform reconciliation on a regular basis and compare the whole account to a bank statement, Money allows reconciling separate transactions in the workspace.
To reconcile a transaction:
- Find a transaction you wish to reconcile in the workspace;
- Click the adjacent checkbox once to mark the transaction as cleared;
- Click the adjacent checkbox twice to mark the transaction as reconciled.
Alternatively, ctrl + click the transaction and select Set Status.
Note: Reconciling a single transaction will change the values of the last reconciling balance and the future starting balance accordingly.
Accounts
Accounts in Money mirror your real-life financial accounts and are the first thing you need to set up in Money to get started. Money has six main types of accounts: bank, cash, credit card, loan, asset, and investment. When you click ‘+’ to add a new account, Money will present you with an option to add a simple type account (managed manually) or choose from a list of supported institutions to create a connected account (requires subscription) that connects to your bank and downloads transactions automatically.
Accounts can also be shared with other Money users to be tracked/managed collaboratively. Account sharing uses iCloud and requires all users to be subscribed to Money Premium or be owners of Money Standard inherited from Money versions 5 and 6.
Your accounts are listed in the sidebar. This list shows account type (icon), name, currency, and balance. You can arrange the list in your preferred order by clicking and dragging accounts. Dragging and dropping one account onto another creates a group, which will then show the sum of balances of the accounts within. Use groups to group accounts for convenience or archive closed accounts.
Ctrl + clicking an account or group in the account list opens a menu of actions available for that item.
Simple type accounts:
- Bank – Displays all transactions to, from, and among your bank accounts;
- Cash – Tracks your spending in cash;
- Credit card – Displays charges made against your credit account;
- Investment – Displays your security-related transactions and reflects your brokerage account. Portfolio provides summary information about your holdings across all investment accounts, as well as gain/loss totals;
- Asset – Displays your valuable assets and helps you track changes in their value;
- Loan – Displays loans for which you maintain a payment schedule.
Note: there is also an additional type of account called a Smart Account. It allows you to gather and automatically update information from all other accounts based on your specified criteria.
Money allows setting up as many accounts of each type as you need and differentiate them by name. For example, if you have two bank accounts, one in Bank1, another in Bank2, the most rational solution would be to create two separate bank accounts in Money and naming them after the bank names. Additionally, if you often use cash in different currencies, it would make sense to create separate accounts for each currency, and name them “Cash USD”, “Cash CAD”, “Cash EUR”, “Cash GBP”, etc. to avoid confusion.
Connected Accounts:
Money can connect to more than 32000 banks across 57 countries and download transactions automatically into connected accounts. You can create a new connected account (see New account options) or connect an existing account to a bank (use Edit Account, then click the eBank field and select one of the available banks). You will be presented with the provider’s login screen – follow the instructions on screen to authenticate with the provider. If you are setting up a new account, after finishing all authentication steps you will be provided with a list of accounts available with this connection. Money will create all accounts that are selected. If you are editing an existing account, you will need to select one account from the list of accounts available with this connection. Once you have connected accounts, Money will regularly check and download new transactions from your bank.
Managing Accounts
Create new account
There are multiple ways to create a new account:
- Click the + icon in the sidebar;
- Ctrl + click on the account list and the sidebar and select New Account;
- Select File > New Account from the menu;
- Press Cmd + Shift + N inside Money.
New account options
When you choose to add a new account, Money will provide options to add connected or simple type (offline) accounts.
If you choose a connected account option – Money will open a provider’s interface for logging in with your bank. To connect – follow the instructions on screen.
If you choose an simple type account option, you get a variety of options to choose when creating a new account:
- Account name;
- Account currency (an arrow beside the account name);
- Account type: bank, cash, credit card, loan, asset, investment;
- Starting balance;
- Credit limit (credit card account only);
- Loan details (loan account only): APR, term, payment frequency, payment account selection;
- eBank – to access your online banking system and download statements, or set up a connected account (requires subscription);
- Notes.
New accounts appear in the account list on the sidebar.
Edit an existing account
To edit an existing account:
- Double-click the account you wish to edit in the account list;
- Ctrl-click the account you wish edit and select Edit from the menu.
You can edit the account’s parameters in the popover menu. When you are finished, click Done.
Share account
Money offers Shared Accounts that allow you to collaboratively maintain accounts with other users.
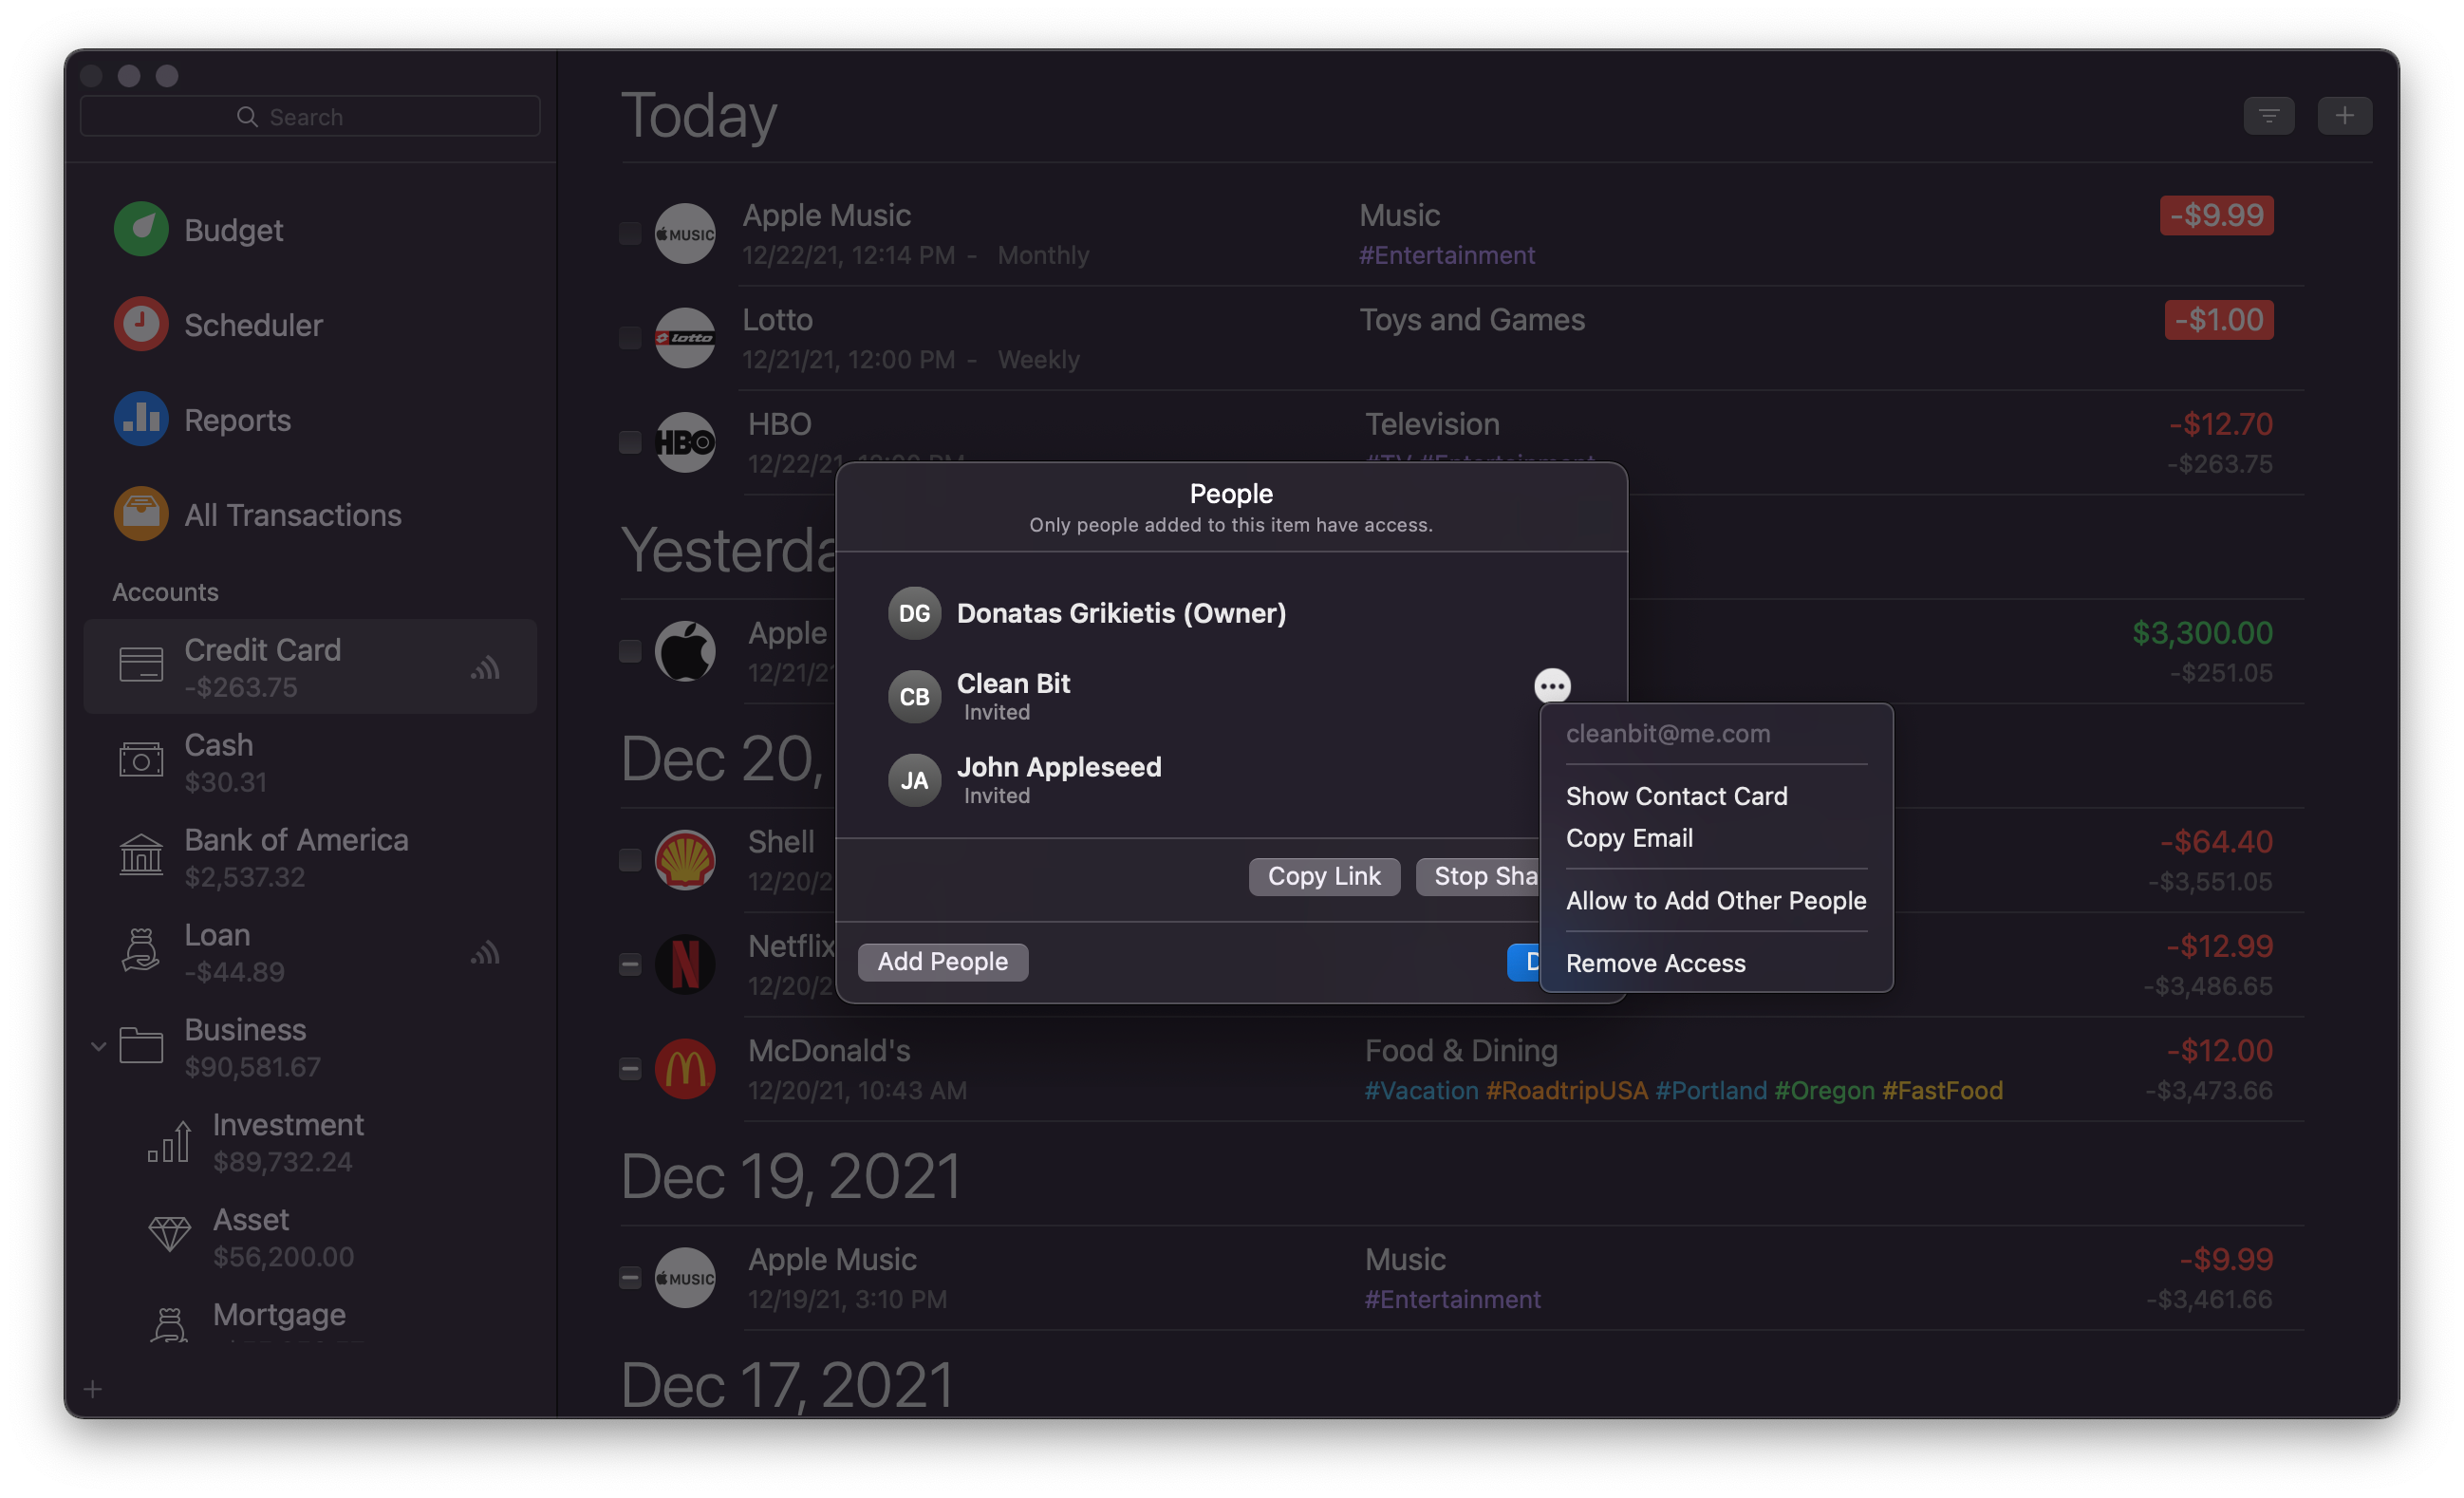
To share an account, click the Share button with the account entry in the sidebar. Once you click the Share button, Money will present the sharing options and display the list of current participants if any.
You can add more participants to a shared account at any time as well as revoke access to any of the current participants. To remove access for a particular participant, click the ‘…’ button and select Remove Access. You can click Stop Sharing to completely stop sharing the account.
Close account
Money allows closing accounts that are no longer used.
To close an account, ctrl + click the account you wish to close, and select Close in the menu.
All closed accounts will be moved to the Closed Accounts folder in the account list.
You can reopen an account any time. To reopen an account, ctrl + click a closed account in the account list and select Open in the menu.
Delete account
You can delete accounts that are no longer necessary.
To delete an existing account:
- Double-click the account you wish to edit in the account list;
- Ctrl-click the account you wish edit and select Edit from the menu.
Note: if you have deleted an account by accident, you can restore it by immediately clicking Edit > Undo or Cmd + Z.
Restore from backup: if you want to restore data deleted a while ago, you can use the restore from backup functionality available in Money Preferences > Backup. Be careful, this will restore Money into the exact state it was at the time of that backup, so any data created later will be lost.
Smart accounts
When working with several different accounts, Money makes it easy to organize and access transactions that are present in more than one account. A smart account allows you to gather and automatically update information from all other accounts using the criteria you specify.
Create new smart account
- Select File > New Smart Account or ctrl + click an account in the account list and select New Smart Account;
- Name the account;
- Choose the main criterion upon which transactions should be selected (date, account, payee, stock, etc.). Click the “+” button to select more criteria for your smart account. The selection of criteria is presented in the following way:
“All/Any” of the following are true:
“Variable 1” “Variable 2” “Variable 3 (if required)” [keyword entry field]
Every time the smart account is selected, it will automatically show updated information based on the pre-set criteria.
To change the criteria of a smart account, find the smart account in the account list and double-click it or ctrl + click on it and select Edit.
Multiple currencies
Money lets you manage accounts and transactions in different currencies and track exchange rates automatically. Money automatically sets the default account currency to match the one you have specified in Preferences > Currency. However, you can select one of the operational currencies to be used with a particular account, as well as change the account’s default currency any time when editing it.
In the sidebar, each account shows its balance in its default currency.
Note: if you would like to set a custom exchange rate for currencies, go to Preferences > Currency, select a currency and double-click it or ctrl + click it and select Edit. In the popover, uncheck Update Rate Automatically and enter your desired rate. Click Done to save changes.
Reconcilation
If you prefer to compare your records with those of your bank on a regular basis, Money makes it very easy to track the monthly statements your bank sends you.
Transaction status
Uncleared – The transaction is added to the account with no official confirmation of it. An empty checkbox indicates an uncleared transaction in the workspace.
Cleared – The transaction has indeed occurred, and you are sure that it was not contrived. To mark a transaction as cleared, click the checkbox to the left of the transaction in the workspace once. A “-“ in the checkbox indicates a cleared transaction in the workspace.
Reconciled – The transaction has been compared to and matches the bank statement. It is the final status that marks a secure transaction. A checked checkbox indicates a reconciled transaction in the workspace.
Reconciling an account
- Select the appropriate account in the account list;
- Select File > Reconcile Account or press Cmd + Shift + R. A list of all non-reconciled transactions pertaining to the account appears in the Workspace;
- In the Start and End boxes for date, enter the respective dates shown on your bank statement;
- In the End Balance box, type the amount shown on your bank statement. The amount in the Start Balance box is the ending balance from the last time the account was reconciled. This amount is automatically calculated for you;
- Check the boxes for transactions that match those on the bank statement;
- While you add or remove reconciled transactions, the Difference line keeps changing. It shows the difference between the reconciled balance in Money and the balance shown on your bank statement. It should be 0;
- When you are finished, click Done. If reconciliation is not finished, Money will ask to either save your progress and return to it later or add an adjustment transaction and finish reconciling;
- If the Money balance matches the bank statement balance, the transactions are marked as reconciled, and you can wait for the next bank statement.
Importing Data
Money offers great flexibility to import data. Whether you are switching from another finance management tool, or wishing to import data from a financial institution, Money has you covered (Direct Downloads require subscription). Money supports QIF, OFX, QFX, CSV, and MT940 formats for data import. Money can export data in a very flexible and widely supported CSV format.
Connecting to financial institutions via Direct Downloads (requires subscription)
- When creating or editing an account, start entering a name of your financial institution into the eBank Website field: a list of available institutions will appear;
- Choose the right institution, and you will be taken to the service provider’s login window. Follow the instructions on screen to log in;
- Once saved, Money will regularly connect to the institution and download your transaction data automatically.
Note: various institutions provide data in different frequency, so while some institutions may update more often, the most common frequency is daily. Many banks have various methods to protect themselves from potential cyber-attacks, which often includes blocking numerous repeated requests made in quick succession – it can result in delays until they allow your connection. Therefore, it is best to not overuse the Download Transactions button – if there are any problems, Money will display a message about it.
Historical data: not all institutions provide historical account data via directly connected accounts. However, most of them allow downloading an archive of your transactions via online banking. You can do that, and then import historical data by using the steps below for “Importing data from a file on your computer”.
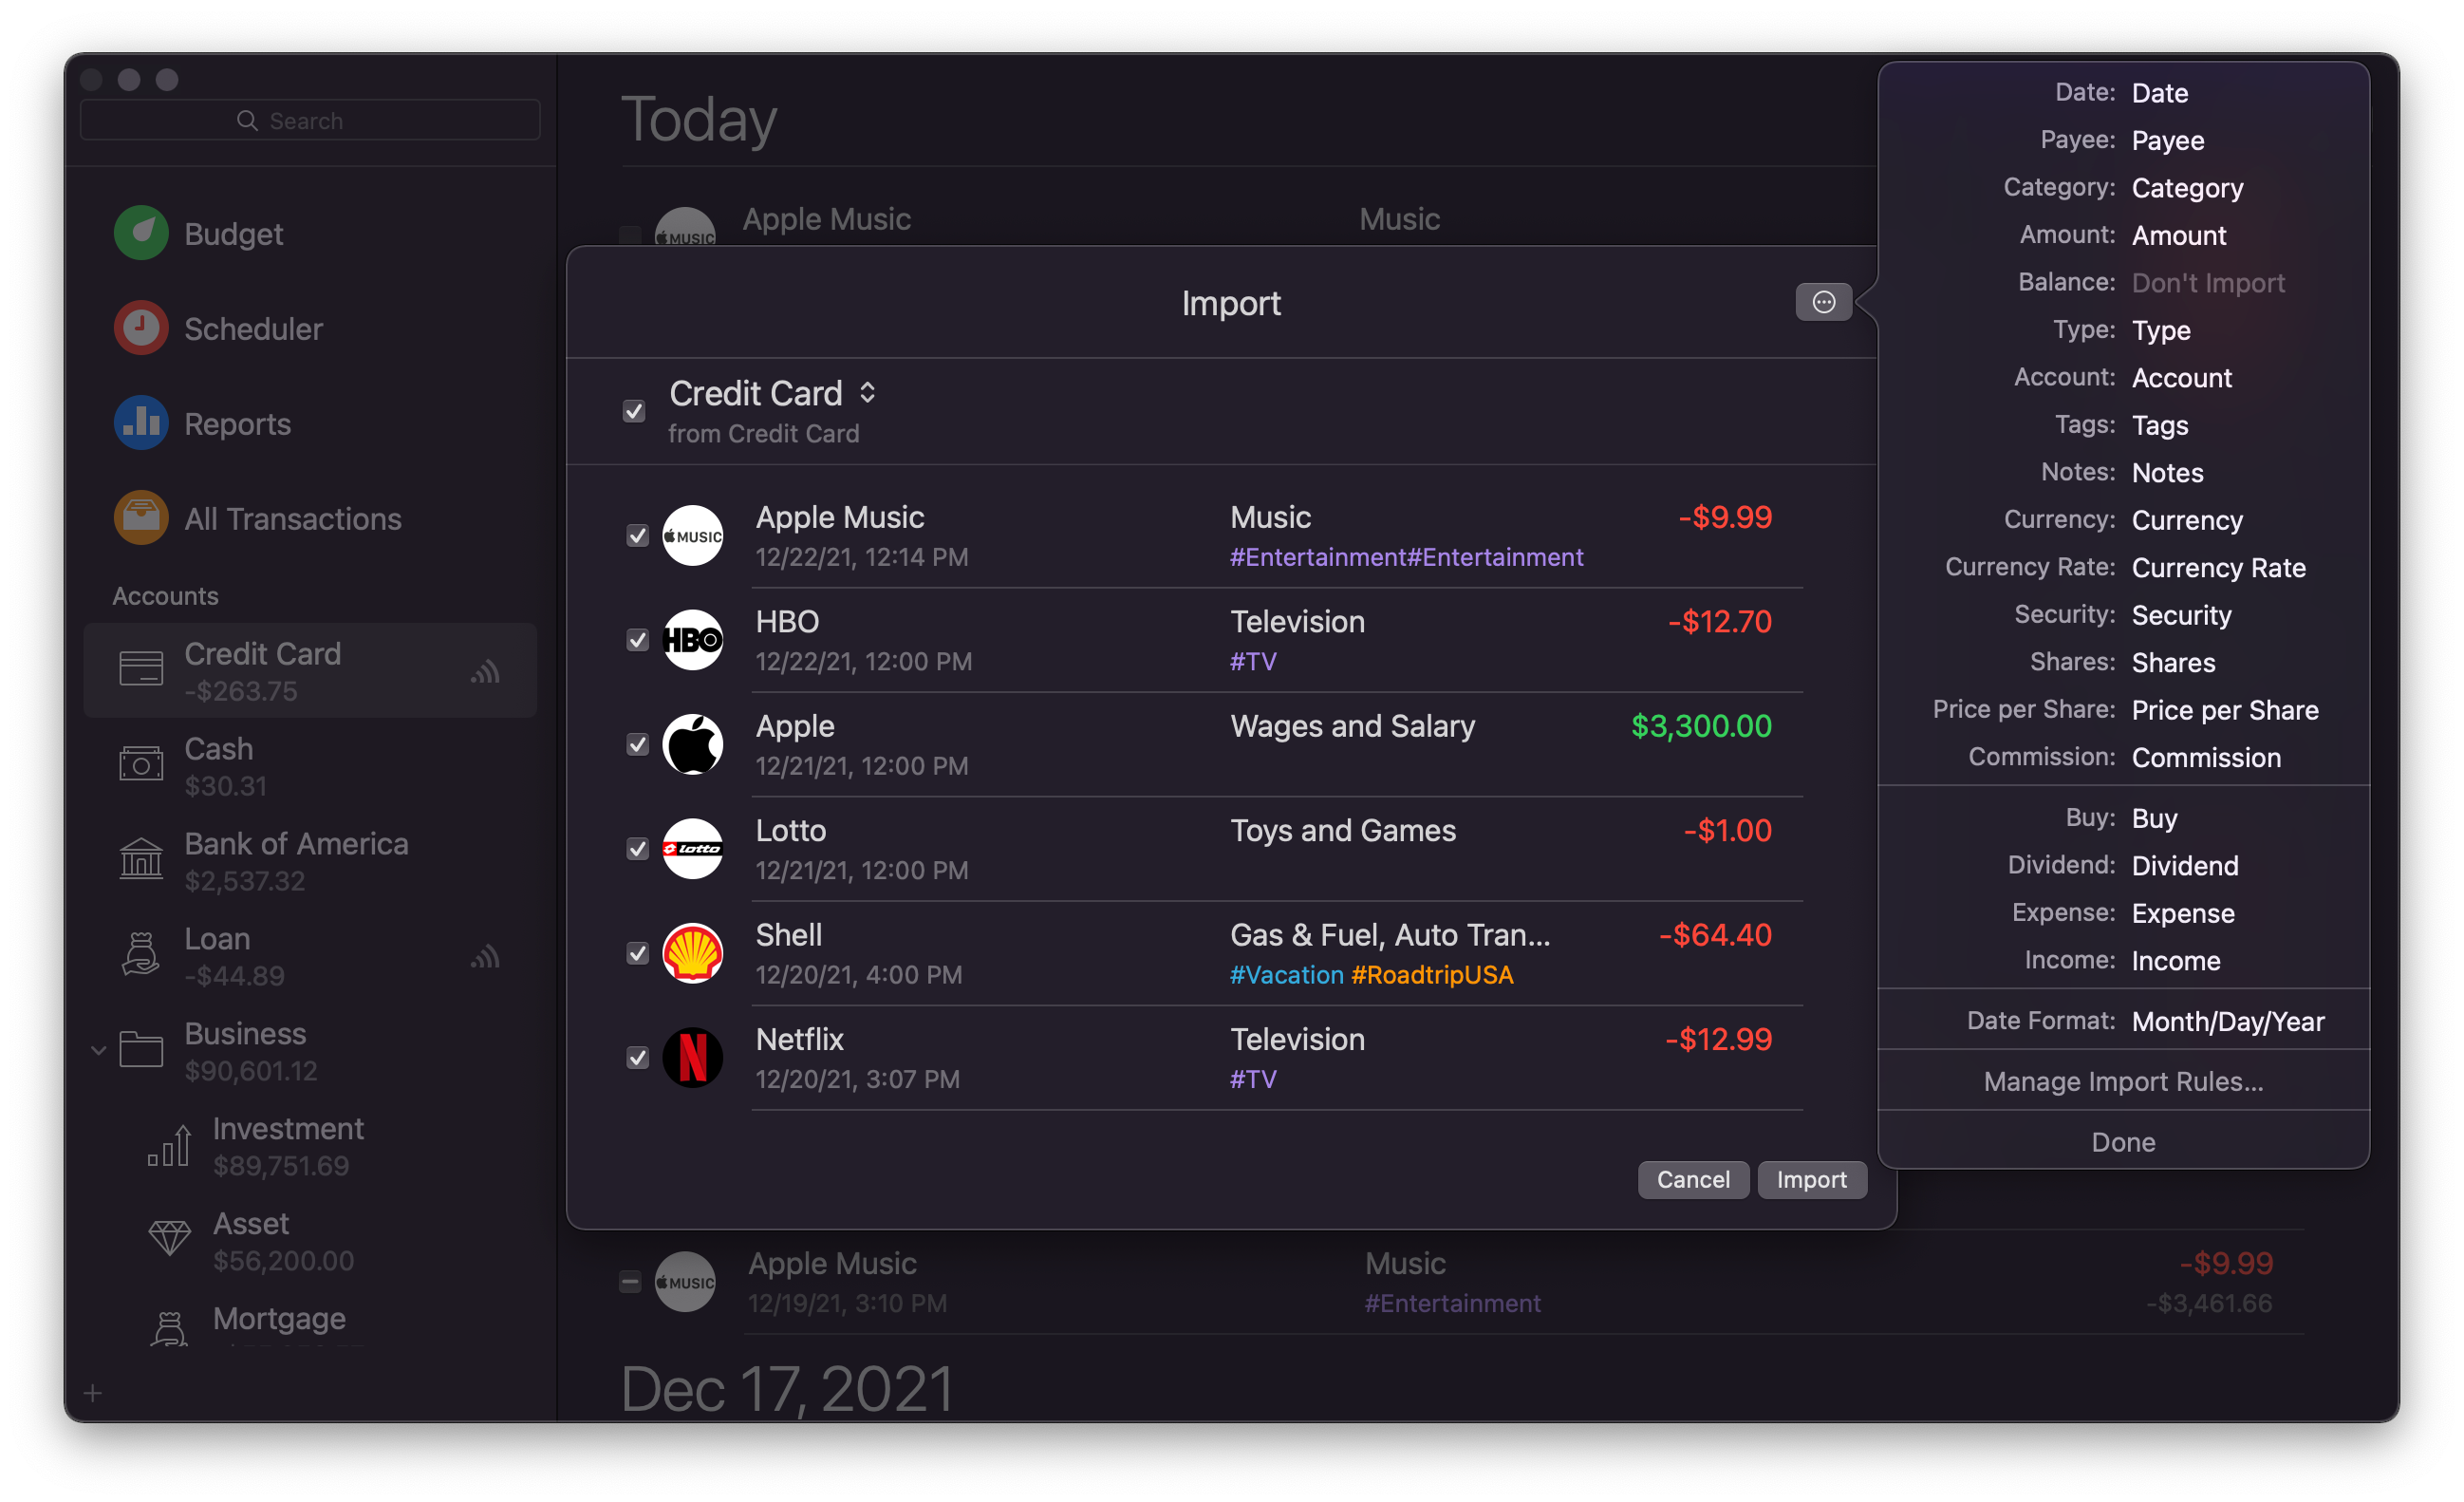
Importing data from a file on your computer
- Select File > Import;
- Choose a data file on your computer and click Open;
- Select an account for importing and make any changes to the list of transactions if necessary;
- Click the gear icon to make more detailed adjustments on how to import data: change the destination for each data field and date format, adjust import rules if necessary.
Importing data from your online banking account
- When creating or editing an account, enter the URL to your online banking account in the eBank Website section;
- A new section called Web Bank will appear in the workspace, it will show a website of your bank. Follow the usual routine to log into your bank account online. You will be asked to enter your username and password;
- Once you are in your online bank account, save the account statement in one of the supported formats. Money should detect the file and start importing it. If not, you may need to import the file manually;
- You will be able to use the Web Bank you have created on a regular basis. It will stay in the workspace of the account.
Importing data from previous versions
Money 7 uses a database format compatible with Money 5 and 6, so updating the app automatically makes the transition for you.
If you wish to import your data from Money 4 and have your data file on your Mac, you can use the File > Import menu to import data. This will copy all the data from your Money 4 file into the current version of Money (the source file will not be modified).
Data from Money versions older than 4.0 can no longer be imported.
Exporting data
Exporting account data to CSV:
- Select File > Export;
- Name the file and choose the location for saving, then click Save.
This will create a CSV file with the transactions of the selected account. The exported CSV file may be opened with other finance or spreadsheet applications.
Note: If you intend to export data for safekeeping, we recommend using iCloud synchronization and Local Backups instead.
Printing account data:
Money can also prepare a printout of your account data. To print your transactions, use the File > Print menu or press Cmd + P while in an account.
iCloud and security
Money uses three extra layers of security to ensure the safety of your data – encryption, iCloud synchronization, and local backups. Adding a password encrypts Money data using a military-grade 256-bit AES encryption, while backing up data to iCloud not only allows keeping it up to date on several devices, but also ensures that data remains safe in case a device is reset, lost, or replaced. Local backups keep copies of your data made at certain points in time, and if there are any issues, Money can be restored to that particular state.
Password
To set a password, go to Money menu > Preferences > Security, and click Set Password. Enter a password hint that could help you remember the password in case you forget it.
After setting a password, Money will give you a recovery key that can be used to decrypt your data in case you forget your password. Please copy the recovery key and keep it in a safe place. If you forget your password and do not have the recovery key, your data will not be recoverable.
To change password, go to Money menu > Preferences > Security, and click Change Password. If you want to remove the password completely, leave the new password fields empty. This will also decrypt your data and continue unencrypted.
iCloud
Money will offer to use iCloud synchronization to keep your data up to date across your devices after launching the app for the first time. iCloud is also used to allow sharing accounts with other Money users.
If you chose not to use iCloud synchronization during the initial launch of the app, you can always enable it in Money menu > Preferences > iCloud, by clicking Enable iCloud. This will copy your data into iCloud.
iCloud synchronization is carried out automatically, however, if you have unreliable connectivity, you can see the date and time of the last successful synchronization.
To disable iCloud synchronization, go to Money menu > Preferences > iCloud, and click Disable iCloud. Your data will no longer be synchronized with other devices.
Note: Money uses iCloud to store its data. Please make sure you have iCloud access for Money enabled in your System Preferences.
Backups
By default, Money makes regular backups of your data. Backups essentially make a copy of your data at particular times for safekeeping and recovery. If any issue arises, multiple backups will be available to ensure the possibility to recover data as it was at a specific point in time.
Money automatically creates backups for the current day, as well as multiple dates in the past for up to 8 weeks. As time passes, older automatic backups are replaced. You can also create a backup manually and it will be stored indefinitely until manually deleted.
To manage Local Backups, go to Money menu > Preferences > Backup.
About Money
Money is a powerful tool to oversee finances – personal, family, and business, record transactions, and keep on track of financial goals. This is made possible with Money’s powerful features presented with a sleek user-interface.
Money is a free download to allow users to test the features and see if Money is right for them. The free version allows using all of Money’s functionality but is limited to 100 transactions. To use Money unlimited, subscribe to Money Premium which also includes Connected Accounts- this can be managed in Preferences > Premium.
Money incorporates six of the most common account types: Bank, Cash, Credit Card, Loan, Asset, and Investment, plus an ability to create automated smart accounts, which display items based on preset criteria.
Money allows users to connect to more than 32,000 financial institutions across 57 countries for automatic transaction data downloads (requires subscription).
Money supports Shared Accounts that can be maintained by multiple users and changes will be synced via iCloud in real-time (requires Money 7.0 or later on all devices).
The user interface in Money is designed to be easily readable, conveniently usable, and elements are presented in a consistent manner for intuitive usage. You can switch between a larger List and a more condensed Table view in the View section in the menu bar.
Money user-interface consists of three main elements:
- Sidebar. Contains a quick-access list to budget, scheduler, reports, list of accounts and groups. Accounts can be rearranged by dragging and dropping;
- Workspace. Displays a list of transactions, a report, a budget, etc., depending on the selection in the sidebar. Each item can be edited right in the workspace;
- Popover. Contains more details about a specific item in the sidebar or workspace, allows data entry and editing, actions for scheduled transactions. Accessed by pressing the details button or ctrl + clicking an item.
Additional user-interface elements:
- Search field. Used to quickly find items by payee, category, tag, account, note, status, date;
- Details button. Used to quickly access an item’s details and edit;
- Add button. Used to add items to the sidebar or workspace (new accounts, transactions, etc.)